Monday, November 19, 2012
Photos?
I've been debating whether I should share my photography photos on here or not, or if I should post them to my other blog Honey Bee's Fancy instead. So I'm thinking for now I'll test things out, maybe post more over there and then only a very few of my absolute favorites here. So here are a few that I really loved from a couple of sessions.
My garden has always been inspiration to me! I love this one of the light shining through honeysuckle vines. Seeing this photo just makes me feel happy
Then I just love this teeny tiny little butterfly, if you know how big the flowers (alyssum) it is sitting on then that gives you a good idea how tiny this butterfly is. An interesting tidbit is that I used to use a stamp very often that was of this very butterfly and I had never seen one in person. So when I saw it in my garden for the first time I was thrilled and had to get a photo of it!
Gotta love the sweet little violas! I liked the idea of having one in focus and the others in the background blur.
Thursday, November 15, 2012
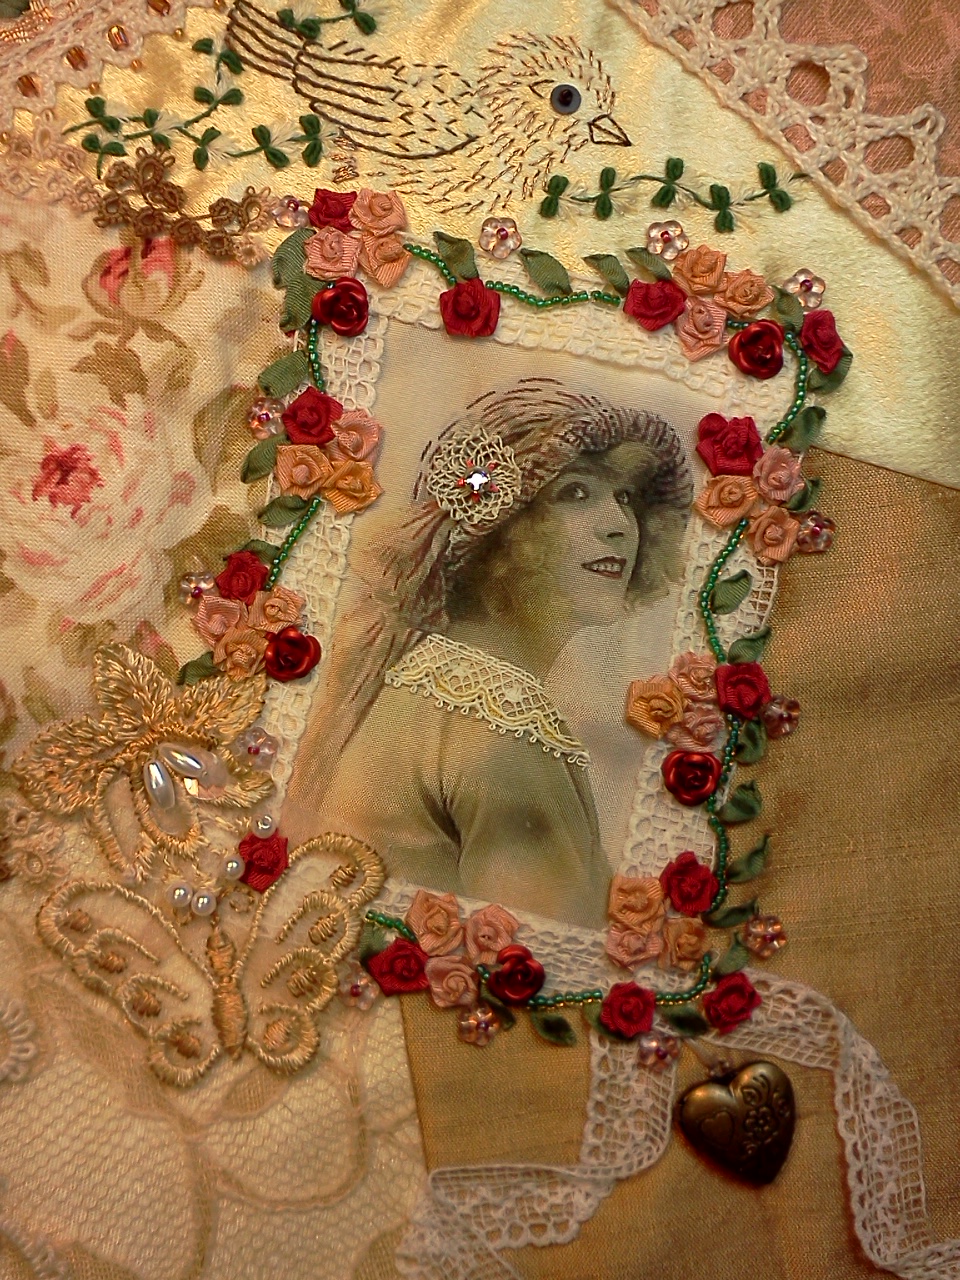
Tarnished Gold: Beads Added
I've added beads to a few more areas and now I'm at the place where I need to sit on it a while to see if it's done. I'm debating over adding some sparkle to the bits of lace I added recently, but nothing feels right so far.
I added some golden bugle beads that are in a slanted pattern like this: / \ / \ / \
In this area I added some gold beads to the center of the roses, and a slanted lightly tinted transparent bugle beads at the top.
And in the rings of the tatting I added some more of the golden bugle beads to give the hint of sparkle in a flower shape.
I added some golden bugle beads that are in a slanted pattern like this: / \ / \ / \
In this area I added some gold beads to the center of the roses, and a slanted lightly tinted transparent bugle beads at the top.
And in the rings of the tatting I added some more of the golden bugle beads to give the hint of sparkle in a flower shape.
Tuesday, November 13, 2012
Some Ornament Photos
I'm venturing into photography, which has been on my back-burner for far too long now, but now is finally able to come to the front. I'm learning all over again with a digital SLR so I thought I would share some of my beginner photos. They say the secret to improving is to take tons of photos, so today I played around taking photos of my Christmas Tree. I will probably do that a lot this month! I didn't shoot any of the hand made ornaments yet, but since I need to practice I will get to them! These are my favorite photos from today. I had opened my front door and the light spilled in onto my tree and I couldn't resist playing with it!
I really love this one, just something about the nutcracker, I'm not even fully aware of why I love this photo so much. Partly the sharpness of his hair, the light hitting him. It's hard to be just beginning, but everyone must start somewhere and I have to give myself permission to be a beginner! ;)I love the sparkles on this bird and the light hitting them.
I liked this one because of the color, and I like the way the glitter looks. I also like how the feathers are softer out of focus further back. I really love the shallow depth of field photos out there and what's known as Bokeh which is basically background blur. I also like the sparkle in the crystal drop. You can see a handmade ornament in the background the Tree that Wendy made for me!
This one loved right away, I love the shininess and the Bokeh of the lights in the background. And you can see a little tatted snowflake in the background too.
I liked this angle too focusing on his beak and the hanging ornament more to the side instead of coming out of his back like the one above. I would have liked to try out a bit deeper depth of field on this one and get more of his body in focus and see what that would be like, so I will keep that in mind for next time.
I like how the sparkles on this guy looks like Bokeh.
And this one I was playing with the exposure, I think the feathers are so wispy and soft looking!
Sunday, November 11, 2012
Tarnished Gold: Added Bugle Beads
Since I'm now adding finishing touches here and there, one of the things I decided was to add some light green bugle beads to the silkie frame. They are treated like leaves. I like the added color, fullness, and texture they give.
I just got a new camera! It's a digital SLR! I'm going to start learning and practicing how to take better photos, and even this DSLR in auto is an improvement over using my phone as I have been! LOL
So my hope is that you will start to see improvement in my photos as I keep growing in this area too!
I'm totally excited and wish I could learn everything overnight and be able to take all the incredible photos I've been dreaming of for so long! LOL At least now I'm able to start this journey!
I just got a new camera! It's a digital SLR! I'm going to start learning and practicing how to take better photos, and even this DSLR in auto is an improvement over using my phone as I have been! LOL
So my hope is that you will start to see improvement in my photos as I keep growing in this area too!
I'm totally excited and wish I could learn everything overnight and be able to take all the incredible photos I've been dreaming of for so long! LOL At least now I'm able to start this journey!
Friday, November 09, 2012
Tarnished Gold: Tons Accomplished
I sat down to work a little more and ended up doing a ton of stuff! I dyed a bit of lace and added it to several places, the silkie, the upper right and the upper left. It seems that only a few finishing touches are left until this block is finished!
Since the center fabric print has just the faintest hint of a lavender color and I had added some tiny clear lavender flower beads to the silkie when I was embellishing it, I added those same lavender flower beads along the lace in the upper right then I took them and added them in the rose motif and used them to "point" and bring the eye around and back down to the silkie. I also added a similar flower bead that is champagne colored and added it to the tatting in the lower left and alternating with the lavender ones in the upper right lace.
I also added a be in the lower left using a interesting bead that my friend Lillian gave me that when I saw it I instantly thought BEE!
The bee is made using the amber and black bead for the body, some black seed beads for the eyes and The wings are worked in the lazy daisy stitch using some Rachelette by Caron tubular thread that has a metallic thread running through it. Then I used some metallic floss to give the wings some definition.
In the upper right corner I added the dyed lace and a label that my friend Lillian also gave me. I thought it looked perfect, from the word, to the rose, to the frayed ends!
I added some of the dyed lace to the bottom of the silkie to additionally frame it.
Since the center fabric print has just the faintest hint of a lavender color and I had added some tiny clear lavender flower beads to the silkie when I was embellishing it, I added those same lavender flower beads along the lace in the upper right then I took them and added them in the rose motif and used them to "point" and bring the eye around and back down to the silkie. I also added a similar flower bead that is champagne colored and added it to the tatting in the lower left and alternating with the lavender ones in the upper right lace.
I also added a be in the lower left using a interesting bead that my friend Lillian gave me that when I saw it I instantly thought BEE!
The bee is made using the amber and black bead for the body, some black seed beads for the eyes and The wings are worked in the lazy daisy stitch using some Rachelette by Caron tubular thread that has a metallic thread running through it. Then I used some metallic floss to give the wings some definition.
In the upper right corner I added the dyed lace and a label that my friend Lillian also gave me. I thought it looked perfect, from the word, to the rose, to the frayed ends!
I added some of the dyed lace to the bottom of the silkie to additionally frame it.
Thursday, November 08, 2012
Tea Party: Applique Update
Wow it's been a crazy long time since I posted about this Tea Party CQ! As you can see I have been working on it but it's only a little bit for how long it's been. I have 5 of the 8 tea cups appliqued down only 3 left! The teapot is crazy, and I found myself not wanting to work on it at all so I switched to the cups. It's hard for me to only work on applique and not be doing the more creative stuff, but I have to finish the applique first so I can get to the fun stuff.
Wednesday, November 07, 2012
Tarnished Gold: A Bird's Nest
Today I watched one of Lilla's recent videos about how to create little Whimseys and in it she created a birds nest. Well I guess it was just the perfect thing to inspire me! I looked at the block and thought a birds nest would be really cute so I tried a few things and came up with one using a couple of yarns and a perle cotton thread. Inside the nest I put 3 little eggs out of pearls and 2 are a darker color and I made 1 a lighter color. I thought it would be cute to have a little variation in egg color since usually that's how it is in nature.
After making the nest I thought it would be great in the lower area but needed a way to let it sit so I grabbed a piece of lace that was a scrap laying around and twisted it and started pinning it in place. I loved the look of it and who know a twisted piece of lace would resemble bark so well for a branch.
I cut out little leaves out of several different fabrics and played around till I got something I liked and then sewed it down by the middles so they would look like the veins.
More and more this block seems to be taking on a theme of a Nature Walk and all the pretty things you might see while out.
After making the nest I thought it would be great in the lower area but needed a way to let it sit so I grabbed a piece of lace that was a scrap laying around and twisted it and started pinning it in place. I loved the look of it and who know a twisted piece of lace would resemble bark so well for a branch.
I cut out little leaves out of several different fabrics and played around till I got something I liked and then sewed it down by the middles so they would look like the veins.
More and more this block seems to be taking on a theme of a Nature Walk and all the pretty things you might see while out.
Tuesday, November 06, 2012
Tarnished Gold: Adding to the Silkie Frame
Yesterday while searching through my stash for inspiration I came across these red metal roses my friend Lillian gave me. I thought maybe they would look nice around the silkie and sure enough I loved the way it enhanced the frame, so I stitched them into place.
It makes me think that it is still unfinished, I've never felt quite satisfied with the way the frame is looking and with the addition of these roses I think it makes it closer to the feel I am wanting. I might hold more bead tryouts and see if adding anything else enhances it as well!
Three bare spots left on this block and still no firm ideas. I think I will concentrate on the frame a bit more to see what else it might need and keep the rest of the block on the back burner to percolate ideas.
It makes me think that it is still unfinished, I've never felt quite satisfied with the way the frame is looking and with the addition of these roses I think it makes it closer to the feel I am wanting. I might hold more bead tryouts and see if adding anything else enhances it as well!
Three bare spots left on this block and still no firm ideas. I think I will concentrate on the frame a bit more to see what else it might need and keep the rest of the block on the back burner to percolate ideas.
Monday, November 05, 2012
Tarnished Gold: Honeysuckle Flowers Finished
I finally got to sit down and finish the honeysuckle flowers! I love them, so sweet and subtle. These photos seem to be a bit better to see the stitching in.
Then I took a few hours trying to figure out what's next! Went though stash and still can't seem to come up with any ideas. I think I'll call it a day, all that thinking and searching makes you tired! LOL I hate getting stuck, but the good news is only 3 more areas to work on till it's finished.
Friday, November 02, 2012
I've Joined the Crazy Quilt Journal Project 2013!
I've decided to join the Crazy Quilt Journal Project 2013! I have noticed that without something to motivate me I tend to put my creative stitching in the background. So when I saw the announcement that registration for this year's project I decided to join it. It simply provides motivation to create a block each month with only a few minimum requirements so your free to express yourself yet giving you motivation to create something new each month! Even if you don't want to join if you follow the blog you will get to see some pretty eye-candy and the year progresses. The 2013 blog is http://cqjp2013.blogspot.com/ and if you want to see last year's participants you can go here: http://cqjp2012.blogspot.com/
I start in January! YAY! So now I'm mulling over ideas, if I want to do 12 themed blocks or not and if so what theme? I was considering the Flower Fairies by Cicely Mary Barker but I don't have any of the fabrics that are available to use and I'd have to do a lot of scrambling for stash. So I'm thinking that this year I will start to collect stash for that theme so that next year I can do Flower Fairies.
I'm also considering a Tea theme, I have always loved the tea themes and haven't gotten to ever complete a project in it. I have stash for it already so I can get to creating any time I want. It would be fun do do a Tea of the Month theme and have them put together in some way. I've really been loving the art journals or books of yummy lace that are out there and have never made one. Maybe I will combine it into a book of sorts that you can flip through and enjoy each block as a page. It would be a nice way to show my work to people and it would be portable too, kinda like a coffee table book. LOL And it would be something I've never done before and would be totally new territory to explore. I really love this idea.
I start in January! YAY! So now I'm mulling over ideas, if I want to do 12 themed blocks or not and if so what theme? I was considering the Flower Fairies by Cicely Mary Barker but I don't have any of the fabrics that are available to use and I'd have to do a lot of scrambling for stash. So I'm thinking that this year I will start to collect stash for that theme so that next year I can do Flower Fairies.
I'm also considering a Tea theme, I have always loved the tea themes and haven't gotten to ever complete a project in it. I have stash for it already so I can get to creating any time I want. It would be fun do do a Tea of the Month theme and have them put together in some way. I've really been loving the art journals or books of yummy lace that are out there and have never made one. Maybe I will combine it into a book of sorts that you can flip through and enjoy each block as a page. It would be a nice way to show my work to people and it would be portable too, kinda like a coffee table book. LOL And it would be something I've never done before and would be totally new territory to explore. I really love this idea.
Wednesday, October 31, 2012
Tarnished Gold: Honeysuckle Flowers
Today I started on the honeysuckle flowers! I used one strand of floss and did tiny thin lazy daisy stitches and then added some yellow pistol stitches. It's so hard to see in the photo because they are so tiny and it's blending into the background fabric(especially the ity-bity pistol stitches), but in person it looks just right for bunches of honeysuckle flowers!
Monday, October 29, 2012
Tarnished Gold: Honeysuckle Vine Leaves Finished
Sunday, October 21, 2012
Tarnished Gold: Little Honeysuckle Vines
OY!!! I love this idea of tiny honeysuckle vines in the background of the bird, but wow have I been having trouble with these bullions for the leaves!!! First I figured out that even through I thought I had the correct needle that nope I hadn't actually been using a milliners needle, which I figured out after having tried a couple sizes of needle, then I get a real milliners needle and it's so much easier but then it was too big of a needle, so then I switch to a smaller one and have some trouble again and have to make sure my wraps aren't too tight etc. LOL
Two bullions per leaf, and so far I have seven sets of leaves completed which adds up to 28 bullions in just this little area! I had to call it a day at this point! LOL My original idea is to have the honeysuckle flowers be out of bullions too but I'm thinking they might be too large if I do in comparison to the leaves, so I might go with some tiny lazy daisy stitches instead. Not sure yet but I still have a ton of leaves left to finish before I get to adding the flowers.
Saturday, October 20, 2012
Tarnished Gold: A Little Birdie
I got the idea to add a little bird, so I sifted through a bunch of vintage patterns to find one and this little guy is the one I chose!
I traced him onto quilters paper and then stitched through the paper and tearing it away when finished.
I don't really like using the quilters paper but sometimes it really is the best option. The patch of fabric is one of those kind of fabrics that you can't draw on because it will snag and ink will run, an iron-on isn't a good option on a crazy quilt either...so quilters paper it was. LOL I really hate tearing it away! There's always the water solvable Solvy but that wasn't viable either since crazy quilts aren't really made for getting wet either, especially this one. And plastic is even worse to tear away than the quilters paper.
So does anyone else have a method that they really dislike but use anyway because it works and is usually the best option?
I stitched him in using different threads for the different areas,
his wings are a variegated brown thread, and his fluffy area is a
metallic thread, as well as his beak. His eye is a little black sequin
with a tiny seed bead.
I love how it seems that the lady in the silkie is looking at him!
Next I'm going to add some tiny honeysuckle vines in the background of this yellow patch.
I traced him onto quilters paper and then stitched through the paper and tearing it away when finished.
I don't really like using the quilters paper but sometimes it really is the best option. The patch of fabric is one of those kind of fabrics that you can't draw on because it will snag and ink will run, an iron-on isn't a good option on a crazy quilt either...so quilters paper it was. LOL I really hate tearing it away! There's always the water solvable Solvy but that wasn't viable either since crazy quilts aren't really made for getting wet either, especially this one. And plastic is even worse to tear away than the quilters paper.
So does anyone else have a method that they really dislike but use anyway because it works and is usually the best option?
I stitched him in using different threads for the different areas,
his wings are a variegated brown thread, and his fluffy area is a
metallic thread, as well as his beak. His eye is a little black sequin
with a tiny seed bead.I love how it seems that the lady in the silkie is looking at him!
Next I'm going to add some tiny honeysuckle vines in the background of this yellow patch.
Friday, October 19, 2012
Tarnished Gold: SRE Rose Motif Finished
WOOHOO The progress for this session got the motif done! I love it! I had one of the leaflets drape over the beaded lace seam and I really love the effect. Then I added some little butterfly beads to continue a butterfly theme. YAY now on to contemplating what's next! LOL
Thursday, October 18, 2012
Tarnished Gold: SRE Rose Motif Progress
A bit more progress, I filled in more roses and some stems.
I used to fiercely focus on projects working for hours and hours to get it done, but lately I've been taking another approach by only taking a couple hours a day to work. So it seems that I don't get as much done but it's really just slow and steady progress. I guess you could say tortoise instead of hare? LOL I want to try this out and see if instead of stop and go if I keep up with a more steady pace, which is why I've been trying to upload my daily progress instead of big stops at the finish of one whole motif etc. I don't even know if I really have any readers left after such long absences that have been common in the last few years. So I figure it doesn't matter if it's boring to see such little increments of progress, it will help me try and keep up a steady pace so it's worth a shot. Why not? What could it hurt? And so that's why I've started blogging again like this. ;D
Wednesday, October 17, 2012
Tarnished Gold: Beadwork
All I got done yesterday was to finish adding the beads to the lace. I do love the dainty effect it gives!
Tuesday, October 16, 2012
Tarnished Gold: Roses
I started adding beads to the lace, and started forming a rose motif in silk ribbon embroidery. I added a red seed bead in special places in the roses. The more open looking larger bud is a new creation I made as I went. It started out a lazy daisy to which I added ribbon stitches to the sides and one to the middle and then added loops at the base.
I used some thread to baste a sketch so I will have an idea how to fill in the rest of the motif.
Monday, October 15, 2012
Tarnished Gold: Lace Added
I have added lace to the seams and a locket at the bottom of the silkie! Off to add some seam treatments now!
Tuesday, July 31, 2012
Lillian's Tablet Pouch/Cover
My dear friend Lillian had sent me tons and tons of crazy quilting stash and in it was one of her blocks that is soooooo stunning! I knew I had to make it into something special for her to use! Lillian also has a Galaxy Tab so I decided to make her a pouch/cover for hers. Here is a link to the tutorial on how to create an easy pouch. The CQ block was already in a U shape but in order for it to fit onto the flap I had to shorten it about an inch but it wasn't a problem since it was the bottom and didn't have embellishments all the way to the edge.
I used an easy applique method and then sewed it to the flap and sewed some purple ruffled lace around the edge as well.
It's nice to create useable things, so that instead of being put away somewhere we can enjoy all the work that goes into crazy quilting and see something gorgeous everyday! Her block was definitely one of those blocks that needed to be enjoyed!
Before I sewed on the block applique I sewed in place some Velcro for a closure.
Subscribe to:
Posts (Atom)