Saturday, September 11, 2010

2010 ESD Enchanted Challenge: Fairy Treasure - Beaded Vine

Finally finished the beaded vine! The leaves are tiny size 15 seed beads, 6 on one side, come back up through the last bead add 4 more and go back through the last bead, and then added a half bugle bead to the center! Then since the side beads kept popping up around the bugle bead I had to tack each side down. I also added by alternating sides some embossed beads. I love how it meanders and it's so sparkly, I love sparkle!
Here's a small shot of my workspace!

Friday, September 10, 2010

Flower Pin: Amanda

Every year I choose something to create as birthday gifts for the girls in my small group at youth group! This year I'm going to create flower pins! First is Amanda she LOVES green so I created a lovely green with a splash of yellow, and used a fancy vintage metallic black/silver glass button for the center!
I'm considering creating extra pins to put up for sale in my Etsy Shop as a fundraiser for my small group girls! We buy each girl a Bible as they become a regular (four consecutive attendances) and we use fund-raising to help buy them. Another thing we fund-raise for is Camps both Summer and Winter Camp but it's difficult to make enough money for all the girls in our group.
I created this yellow flower pin with that in mind. I just don't know if it's worth the time to put it up on Etsy, things don't seem to sell well there for some reason and it's a lot of work uploading photos and writing all the info etc. I'm also considering having a Flower Pin making party where the girls can all create flower pins for sale and I can put them up in Etsy also.
Any feedback is welcome.

Thursday, September 09, 2010

Flowers and Hearts Block

I'm doing a private 8 inch block exchange with the theme of Flowers and Hearts! I pieced this block to send to Kathy and she will send me one and we will embellish each others blocks and send them back to each other by 14 Feb. 2011! Why so far off a deadline for one block? Well because we are both busy as all anything!!! LOL If we happen to get it finished sooner that's great but no rush, no pressure, just fun relaxed sharing our work with one another!

Wednesday, September 08, 2010

2010 ESD Enchanted Challenge: Fairy Treasure - Update, Heart Necklace

I added some straight stitches in gold holographic sulky thread! I may add more to the lace etc. later. I never really have a solid plan as I work it's kinda organic and free flowing, I go with what feels right and sometimes I have to wait awhile before I know what will go perfectly.
I've been learning a lot about myself, and my style of work as I'm working on this challenge piece. Starting to understand why I get stuck and what helps me get out of that and how my creativity flows and such. It's funny how art can reflect life too some of the same reasons for being stuck in my creative process are the same reasons I get stuck in other areas. And how a realization in one area helps the other area too! Sometimes I just marvel at how God created us like that! Truly we are fearfully and wonderfully made!
I praise you because I am fearfully and wonderfully made; your works are wonderful, I know that full well. ~ Psalm 139:14
Here I added little gold bead caps with seed beads as little flowers in the vine!
I sewed on a crystal heart and used some of the challenge fiber as a necklace ribbon and tacked it on with gold holographic sulky thread! Above that is some of the challenge fiber ruched, sewn in place and a button added to the middle.
Here is a vine in progress I couched on the metallic thread. I'm adding beaded leaves and embossed beads along it to create a vine that winds through patches and the blocks helping to weave it all together.

Tuesday, September 07, 2010

Friendship Garden

My dear friend Wendy agreed to help me make a friendship wall hanging! She is going to embellish 3 (the below photo) of the 6 six inch blocks and I'm going to embellish 3 (the above photo) and then I'll combine them into a wall hanging of our friendship!
We've all heard the saying "Friends are the flowers in the garden of life" well Wendy is one of the best flowers I could ever ask for! I'm grateful that God put her in my life, she is truly special and I treasure her gift of friendship to me!
Here they are in a baggie ready to go to Wendy!
We aren't having any time deadline to get them done just whenever no stress! I know they will get done at just the right time, things always seem to work out like that!

Monday, August 30, 2010

2010 ESD Enchanted Challenge: Fairy Treasure - Buttons, Jasmin, Maiden Hair Fern

I added in some lost buttons with a scalloped chain stitch around them for a seam treatment.
For the Jasmine seam treatment I started by fiddling with a vintage rhinestone earring and I liked the curved shape when I saw it so I stitched it down and drew a wavy line down the rest of the seam and stitched that in stem stitch with a metallic thread. Then I added stems and ribbon stitch leaves, next I added three loop stitches with vintage rhinestones in the centers for the flowers. I used a veriagated 4mm ribbon that is cream with a hint of golden yellow.
I got the idea to try and create Maiden Hair Fern so I google searched images and I was sweetly surprised to see that it would be easy to do! You see Maiden Hair Fern stems look exactly like a feather stitch and I thought a ribbon stitch in 7mm that has a looped tip instead of a pointy tip would work perfect for the leaves! I used a spare needle to keep the loop tip in place as I created them. To create different sizes of leaves I varied from 1, 2 and 3 stitches side by side since the leaves are fan shaped.

Sunday, August 29, 2010

2010 ESD Enchanted Challenge: Fairy Treasure - Honeysuckle

I hand dyed some lace to add in, so both pieces of green lace you see in this post are a result of that!
I also added in a little flower (primula candelabra) that I learned from the book Silk Ribbon Embroidery by Ann Cox and it uses a stitch I've never done before for the flowers it's a french knot tipped ribbon stitch and right before you pierce the ribbon for the ribbon stitch you do a single wrap french knot! I just thought that flower looked cute poking up right there!
I also added in some ribbon stitch vines, which are my favorite!
I also sewed down a gold dipped leaf earring. I actually got the pair when I was a teen and visited the Black Hills! I don't wear earrings anymore so I've been saving them for use in CQ and this project seemed the perfect use!
Then I added a scallop to the lace and added honeysuckle flowers and leaves to the scallops!!! I love this idea I've never done honeysuckle before and none of my books have any that I loved so I made my own idea of honeysuckle! The stamens are twisted pistol stitch in gold 4mm ribbon and then I used a golden yellow 4mm ribbon and worked straight stitches for the petals two at the top and one at the bottom. The leaves I added are 7mm ribbon stitch. I'm thrilled with how it turned out!!!
The honeysuckle flowers darken to a golden yellow as they age.


Saturday, August 28, 2010

2010 ESD Enchanted Challenge: Fairy Treasure - Pretty Bow

Well finally inspiration has struck and creativity is flowing and I'm starting to get things done this challenge piece!
This bow fiber is a piece from the challenge packet and I was fiddling around and got the idea to try a bow with it and I really liked it so I started pinning and at first I wasn't sure if I wanted to go with it. I tend to get stuck with indecision about what I want to do and afraid that if I commit to it I may regret it later but then I realized what was going on and and decided that since I love it I should just DO it! So I started thinking about the seams underneath it and started to fill them in before sewing it down. All I do is unpin and do the seam and then re-pin after it's finished.
I also got the idea to add a key attached to the bow and I love the look of the jewelery finding in the center of the bow too.
The first seam I did was a simple feather stitch in dark green sulky holoshimmer thread.
Then I worked this seam in quarter buttonhole stitch with a thicker metallic thread and added tiny green seed pearls!
My little fairy, Peridot, loves to put little treasures she finds in the perfect spots in her garden! Who knows what treasures the key unlocks!?!

Friday, August 27, 2010

Teaching Crazy Quilting!

Jessica wanted to learn Crazy Quilting and she had bought a little sewing machine and brought it over to learn to use! So I taught her how to piece a block! She is so excited about it! She started embellishing it too! She added a piece of vintage lace and started a seam treatment!
We used a wavy line and doubled it one wave will be light purple and the other wave will be pink! I taught her the chain stitch to work the waves in!

Pillow Cover Birthday Gift

Wendy made Joseph a quilt for his birthday so I decided to make a pillow to go with it! What I love about Wendy's kids is that they LOVE handmade things just as much as cool toys and you know the made things will last longer!
What I did was cut out squares to fill an 18inch square and sewed them together. Because I used a large square for a BDU pocket I had to adjust the sizes of the other squares to make up for it. I'm "challenged" in the area of calculations so my wonderful hubby helped me out with that part! LOL Anyway I used reclaimed jean, plaid pants, BDU and ACU fabrics and added in a tie-dye fabric too!
It was a taste of traditional quilting for me and WOW does it really prove to me why I don't do traditional quilting! LOL But the reason I did it was that I wanted it to have the same square patch look as the quilt his Mom made.
I just sewed it together like the other pillow covers I've made are using the BDU and ACU fabrics.
Needless to say he LOVED it too!!!

Friday, August 13, 2010

Monogram Tote Bag: R

Here is Robyn's tote bag! Her request was hearts so I cut out a bunch of hearts she also likes polka-dots so I coordinated different polka-dot prints with a floral print for the 'R'. Even the floral print has tiny little polka-dots as a background for the flowers! I also tied some eyelash yarn in a bow on the handle.
I used a heart for the hole of the 'R' as well to keep the heart theme going!
To add a little sparkle I sewed green and pink sequins on with invisible thread to polka-dot the inside of the 'R'.

Thursday, August 12, 2010

Monogram Tote Bag: L

Here is Leah's tote! For her's I chose a flower print for the 'L' and so I didn't want to cover it up. With that in mind I got the idea to cut out leaves and put them around the 'L'. I just cut out leaf shapes free-style in the green fabric and then cut out a second leaf shape to be either another leaf with it or a shadow to the green one, however you want to look at it. I just sewed them down by machine in the centers of the leaves using invisible thread.
I then got the idea to put a beaded edging around the 'L' which I just used the beaded back stitch (all by hand of course) and alternated a pearl with a tiny gold bead.
I also put a pretty floral gold heart bead on!

Tuesday, August 03, 2010

Teaching Embroidery & Tatting

Jessica loves to do creative things and she wanted to learn embroidery! Well who can resist teaching someone who wants to learn? And who doesn't LOVE to teach something they love to do? So of course I got her started! LOL
She also wants to learn crazy quilting so this embroidered piece will be a center of a CQ pillow. It's purple flannel and we used an iron on for Sweet Dreams and the birds. I just showed her the back stitch and she was off!!! I got the idea for her to fill it in with seed stitch just to give it more substance but still be easy, she loved that idea too!
As she progresses with her project I'll keep you all updated!
Jessica also wanted to learn tatting! So I taught her! It's so rewarding to teach someone who is so determined to learn! I had sent her home with the homework of just practicing stitches in rings and leaving spaces between rings and then when she came over again she had them down and was ready to then learn picots so I have her practicing that now and next will be joining!

Amanda also wanted to learn tatting so I taught her as well! She also is determined to learn and she's a dancer so she's used to having to be coordinated so for her she learned a lot faster! I was able to send her home with the homework of practicing a simple one shuttle pattern 3+3-3-3 and WOW has she been practicing! She's improved her control so much just look at that edging hanging down her hand!!!
So she's going to stop by today and I'm going to teach her a double sided one shuttle pattern for her to practice and after that I'll move onto a Hen & Chicks pattern. I couldn't find a double sided pattern I really liked when tatting up a sample for her so I fiddled around with stitch counts and picot placement and came up with one that I liked it's 4+2-2-2-2-4 RW leave a 1/4 inch space of thread and continue. Of course I wrote out the pattern way more clear for her being a beginner! What I do for the girls is I draw a diagram, write out the pattern clearly, and attach a sample I tatted of the pattern. This pattern will teach her how to reverse her work and practice getting the spaces between rings even, as well as continuing to practice stitches, picots, and joining!

Monday, July 26, 2010

Monogram Tote Bag: E

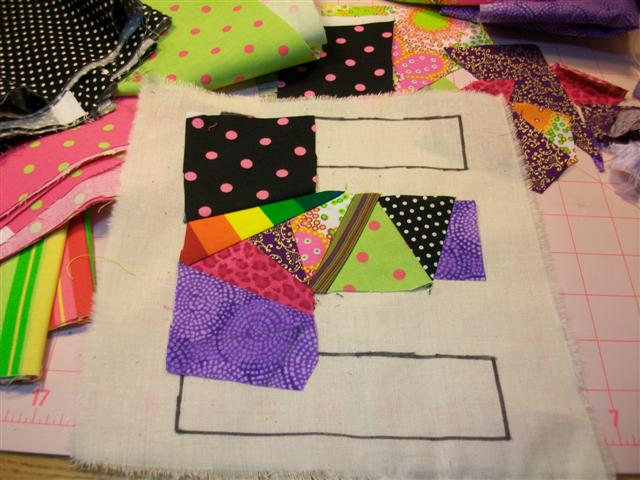
This Tote is for Elizabeth! She never has a favorite color for long because all the colors are her favorite! She also loves to do crafts etc. so I had to do her "E" crazy quilt style!
It was a bit of a challenge to piece being the odd shape it was! What I did was draw out the 'E' onto foundation fabric and then I started on the middle prong and pieced to the center and then went down and out the bottom prong and up and out the top prong. Of course I used ALL KINDS of fun fabrics because just like she likes all colors she likes all fabrics too! LOL
When I finished piecing I cut out the 'E' and sewed it onto the bag using the zig-zag stitch and a variegated green thread.
To embellish I sewed on a yellow butterfly applique, assorted buttons, a working locket she can add a photo to, a scissors charm, and a gold tone cross-stitch needle since it has a rounded tip!
I used a pink metallic thread and tied a knot at the end and a knot onto the end of the needle and put the knot on the top of the fabric to be seen and then did some running stitch randomly until I got the needle to where it would stay. Once in the spot I took beading thread and tacked down the eye so that the needle can't fall out!
It can't get any more perfect and fitting than that!
I just know she will love it!