Monday, November 22, 2010

2010 ESD Enchanted Challenge: Fairy Treasure - Right Side of Piece

The lower right got a little more added than the last time I posted about it. It now had a couple of keys tucked in and the scallop seam treatment has a bit more added to it.
Along the right edge I put a piece of dyed lace to act as moss and a double sequin butterfly.
Here is a closer look at the fern with the 2 keys tucked in around it!
The scallops got a fine lazy daisy and stright stitches in between them and some beaded leaves on the rounded parts. I also added some little yellow Fargo Flowers (not the same as the Sweet Heart Rose but similar) from JBM's Floral Stitches book on page 94.
Here is a closer look at the crystal heart "necklace" I added using one of the challenge fibers that is couched down with a gold thread in tiny running stitches. A couple more double sequin butterflies are fluttering about it as well!Here's a look at the fluttering of double sequin butterflies! What I did was use 2 of the same shaped sequin and overlapped them. Underneath is a gold one and over it is a clear one which calmed the tone of the gold and even added a greenish tinge making the butterflies just perfect!
You can also see another key tucked in this area. I also added some green feather stitches as background greenery.
I added a large vine that I created by a feather stitch wandering about and then I added ribbon stitch leaves to each arm and then added gold bead caps with gold pearls for flowers.
I added a piece of feather trim with another key tucked in on top of it. Also below the feathers is a fancy button on top of some rushed fiber from the challenge package.
I added a gorgeous bee buzzing about and above the bee is a seam of cretan stitch in shiny gold thread.
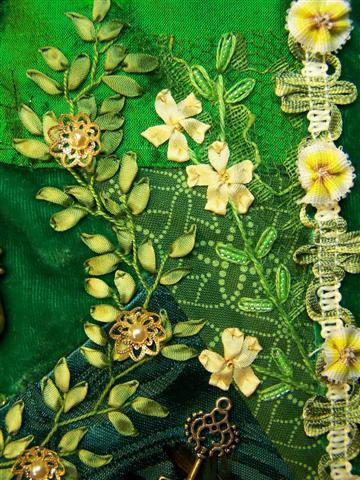
I added a little floral motif over the top of some more of the dyed lace acting as moss. The motif is made using stem stitch for the stems, lazy daisies as the leaves with seed beads added to the centers, and for the flowers is 5 petals of ribbon stitch with a slight loop left on the tips and a gold seed bead in the center.
I tucked in a bit more feather stitching at the top. In the center is a Keyhole that I added gold glitter to the center since I didn't like what was in the center previously. I think the glitter adds the the magical feel!
To the left of the keyhole is a piece of hand dyed lace and a string of pearls. The original set of pearls was too large so I removed the clasp and added my own gold pearls and sewed it all down!
WOW that was a lot to look at and explain!!! And yet I still have so much more to share!!!
More to come...

Friday, November 19, 2010

Christmas Gift: SRE Embellished Family Portrait

This year for a Secret Santa gift exchange I got a sweet lady who has 4 adorable kids! So I got the idea to use a couple of their family photos and create something special with it. The finished project will be framed. For the background I used a sweet polka dot print and ironed on some photos printed on fabric sheets made for this. I also cut the photos into ovals. My plan is to do a lot of Silk Ribbon Embroidery around the photos and make it really special.
At the top I wanted the word "Family" so I used a word processing program to print out "Family" in the French Script Font. I then used a light box and traced it onto the fabric with pencil.
I stitched in the word using 1 strand green DMC floss in Stem Stitch and then started adding bead embroidery to the spaces of each letter. I used tiny size 15 seed beads.

Sunday, November 14, 2010

My Annual Christmas Ornament Creations

This was all created Oct.1 but I haven't had the chance to blog it until now!!!
On the far right is the collaboration ornament of Elizabeth and me and the other 2 to the left are the ones I created while she was having fun creating!
Here's my first one which I choose to keep for myself. Every year I make Christmas Ornaments: One for our tree, one for Wendy, and one for the annual Ladies Ornament Exchange at our church.
This is the second one I made and Wendy loved it so it will be hers!
This last one was created after I saw Allie Aller's Crumb Piecing Tutorial! I just took all the scraps from my and Elizabeth's creations, crumb pieced them and then cut it down into a square. I think it still needs a few extra sparkly embellishments before it's totally finished but it is really cute as is too!

Saturday, November 13, 2010

Elizabeth's Christmas Ornaments!

This was all created Oct.1 but I haven't had the chance to blog it until now!!!
This is Elizabeth!
She LOVES to create stuff!
She wanted to learn to sew so we started with a small CQ heart to turn into an ornament, but she almost despaired when she saw how her heart was turning out. When I looked at it I didn't see it as "messed up" I saw the start of the style of fiber art I see online all the time so I suggested that she sew bits of lace on random fashion like Lilla LeVine does! She loved that idea and here is the result! I told her this was the perfect example of what my Art Teacher would always say "Art is making order out of chaos!".
Isn't it amazing!!! I loved it so much that she let me have it for my own Christmas tree! How special it's truly a treasure to me! I suggested adding some embellishments to make it extra pretty and she didn't feel like doing that but said I could go ahead and do that part! LOL She's not into fine detail work yet, but I remember being that way myself! LOL
Here is the finished Ornament after I added a few finishing embellishments. I think our collaboration turned out to be a wonderful memory that I will cherish every year as I place it on my tree!
Here's three other ornaments she made and this time she sewed on some embellishments! Aren't they so creative and cute!?! Every year our church does a Ladies Ornament Exchange and she says she's going to use these as her Ornaments as a set.
She also whipped together a couple of blocks to stick in her school binder.

Next post I'll show you the ornaments I made while she was making hers!!!


Tuesday, November 09, 2010

2010 ESD Enchanted Challenge: Fairy Treasure - Center Motif

Well, here's a better look at the center motif! You can click on any of the photos to see them larger.
This was the last part of the whole block I worked on which made it difficult but I don't really see how I could have worked on it first. I needed the inspiration of the whole block to really know what I wanted to do there! Sometimes you just can't control how your creative process flows no matter how badly you want to! LOL And even after leaving it for last I had a vague idea of what I wanted but no solid ideas to get it done. Then I finally got the idea to place vintage earrings around and put foliage in around them. The problem was I had run out of vintage jewelery!!! So I went to my local antique store and found some pieces that looked great in the area. Some of the earrings needed the large clip on backs taken off so that they would sit on the block well. My husband used his Dremel to remove them! ♥
I also used some vintage marquee shape montees and a large rhinestone.
For the foliage I used 2 shades of green silk ribbon and worked them in a french knot with a loop left at the top. Usually with that combination stitch there is an added french knot in floss added to make a little flower. I also created a few of those flowers as you can see in the above photo. All those knot/loop leaves were a pain to create for sure! LOL They are very finicky and can get snagged and pulled too tight too easy, but that was the look I wanted and so I trudged on creating them!
I also created a couple long leaves on each side with the same ribbon in a long twisted ribbon stitch that I couched with a little seed bead. The flowers I created to go with them are created using 3 straight stitches with 2 colors ribbon and the stems made with one strand floss with a french knot at the base of the flower.


Friday, November 05, 2010

2010 ESD Enchanted Challenge: Fairy Treasure - FINISHED!!!

Well I'm all finished!!!!!!!!!!!!!! YAY!!! I just sent off all the photos to Carolyn!
For now I'll just put these large overall photos and one of the middle and I'll start blogging more detail! I kinda fell off of blogging as I went for a while, life got pretty crazy and when that happens you can only do as much as you can do! My priority was at least to keep working so I could get it finished in time. So now that I'm finished, and things are starting to settle down I'll start blogging the details of this piece!
I'm so thrilled how it turned out!!! It's so special! To finish it I hand sewed silk velvet strips on and mitered the corners by hand and then hand sewed the floral trim in place as well. It's being framed so the velvet is the matting.
If you look closely you will find all kinds of special things, jewels, earrings, keyholes, keys, bees, butterflies, flowers, lockets and buttons! I did a lot of new to me techniques and streatched myself by creating motifs and flowers that are not my typical go-to flowers!
I used lots of vintage jewelery, the center has earrings all around with loop-knot leaves and sweet flowers tucked in.
Click on the photos to see each them closer!

Wednesday, September 22, 2010

2010 ESD Enchanted Challenge: Fairy Treasure - Challenge Thread

In the challenge we are to use half the threads and fibers, this sometimes presents a tough spot to be in thus creating the "challenge" LOL! For me I want to stay withing the color theme of my piece and some of those threads don't fit that at all! That being said I have to use some to meet the requirements, but at the same time I don't want to compromise my vision!
So I started using the overdyed challenge thread (which is really nice to work with BTW) for a half circle blanket stitch. That alone wasn't enough you could see obvious pink and blue shades so I started fiddling with it to see if I could fool the eye into thinking you aren't really seeing colors that don't go. What I came up with was to do a second blanket stitch half circle over the top of the first one and then add a green pearl! AND IT WORKED!!! You still see the colored thread underneath but it feels right, and not like a compromise, the impression is of green stronger than other colors yet those colors are still there peeking from under the green wool thread!
I'm happy that I met the challenge while keeping the color theme of my piece!

Sunday, September 12, 2010

2010 ESD Enchanted Challenge: Fairy Treasure - Bead Flower Motif

Here is a motif I created to use some of the beads in the challenge packet. She didn't include very many beads to choose from only 3 types and 2 of them would look totally wrong on my block since they aren't within my color theme. BUT there were some yellow flower beads that would work but they had a more greenish tint to them rather than the more golden yellow I'm using. So what I did was find other flower beads in my stash that were green and yellow and I mixed them all together and started a flower bead motif which I added silk ribbon to and some french knot spikes and a few "found" trinkets and treasures.
For leaves I created a puffy leaf by doing a looped french knot just like for the little french knot flowers BUT I didn't add a second french knot with thread but just left it looped.
You see the yellow flower that looks kinda stripped at the tip of the motif? That is the challenge packet's bead flower. I used 3 of each flower bead in the motif.
To all that I added a couple of gems a little working locket, and a key.

Saturday, September 11, 2010

2010 ESD Enchanted Challenge: Fairy Treasure - Beaded Vine

Finally finished the beaded vine! The leaves are tiny size 15 seed beads, 6 on one side, come back up through the last bead add 4 more and go back through the last bead, and then added a half bugle bead to the center! Then since the side beads kept popping up around the bugle bead I had to tack each side down. I also added by alternating sides some embossed beads. I love how it meanders and it's so sparkly, I love sparkle!
Here's a small shot of my workspace!

Friday, September 10, 2010

Flower Pin: Amanda

Every year I choose something to create as birthday gifts for the girls in my small group at youth group! This year I'm going to create flower pins! First is Amanda she LOVES green so I created a lovely green with a splash of yellow, and used a fancy vintage metallic black/silver glass button for the center!
I'm considering creating extra pins to put up for sale in my Etsy Shop as a fundraiser for my small group girls! We buy each girl a Bible as they become a regular (four consecutive attendances) and we use fund-raising to help buy them. Another thing we fund-raise for is Camps both Summer and Winter Camp but it's difficult to make enough money for all the girls in our group.
I created this yellow flower pin with that in mind. I just don't know if it's worth the time to put it up on Etsy, things don't seem to sell well there for some reason and it's a lot of work uploading photos and writing all the info etc. I'm also considering having a Flower Pin making party where the girls can all create flower pins for sale and I can put them up in Etsy also.
Any feedback is welcome.

Thursday, September 09, 2010

Flowers and Hearts Block

I'm doing a private 8 inch block exchange with the theme of Flowers and Hearts! I pieced this block to send to Kathy and she will send me one and we will embellish each others blocks and send them back to each other by 14 Feb. 2011! Why so far off a deadline for one block? Well because we are both busy as all anything!!! LOL If we happen to get it finished sooner that's great but no rush, no pressure, just fun relaxed sharing our work with one another!

Wednesday, September 08, 2010

2010 ESD Enchanted Challenge: Fairy Treasure - Update, Heart Necklace

I added some straight stitches in gold holographic sulky thread! I may add more to the lace etc. later. I never really have a solid plan as I work it's kinda organic and free flowing, I go with what feels right and sometimes I have to wait awhile before I know what will go perfectly.
I've been learning a lot about myself, and my style of work as I'm working on this challenge piece. Starting to understand why I get stuck and what helps me get out of that and how my creativity flows and such. It's funny how art can reflect life too some of the same reasons for being stuck in my creative process are the same reasons I get stuck in other areas. And how a realization in one area helps the other area too! Sometimes I just marvel at how God created us like that! Truly we are fearfully and wonderfully made!
I praise you because I am fearfully and wonderfully made; your works are wonderful, I know that full well. ~ Psalm 139:14
Here I added little gold bead caps with seed beads as little flowers in the vine!
I sewed on a crystal heart and used some of the challenge fiber as a necklace ribbon and tacked it on with gold holographic sulky thread! Above that is some of the challenge fiber ruched, sewn in place and a button added to the middle.
Here is a vine in progress I couched on the metallic thread. I'm adding beaded leaves and embossed beads along it to create a vine that winds through patches and the blocks helping to weave it all together.

Tuesday, September 07, 2010

Friendship Garden

My dear friend Wendy agreed to help me make a friendship wall hanging! She is going to embellish 3 (the below photo) of the 6 six inch blocks and I'm going to embellish 3 (the above photo) and then I'll combine them into a wall hanging of our friendship!
We've all heard the saying "Friends are the flowers in the garden of life" well Wendy is one of the best flowers I could ever ask for! I'm grateful that God put her in my life, she is truly special and I treasure her gift of friendship to me!
Here they are in a baggie ready to go to Wendy!
We aren't having any time deadline to get them done just whenever no stress! I know they will get done at just the right time, things always seem to work out like that!