Showing posts with label Flower Pin. Show all posts

Wednesday, July 27, 2011

Flower Pin/Hairclip: Fay

This flower I made using a couple of purple fabrics, some large hole tulle and some bits of purple lace. I glued a vintage style gem in the center!


Thursday, June 02, 2011

Flower Pin/Hairclip: Randi

Here is a simple sweet little flower made using three different green prints, topped with a fussy cut butterfly!


Wednesday, June 01, 2011

Flower Pin/Hairclip: Cheyenne

For this flower I used a purple leopard print mixed with an organza print, and some purple netting. In the center is a silver flower sequin topped with a star sequin and a purple bead.


Wednesday, May 25, 2011

Flower Pin/Hairclip: Stephanie

This flower is made using Black and White prints, a touch of red with some black lace, a pretty black button, and a couple of black feathers!


Thursday, April 14, 2011

Flower Pin/Hairclip: Ashley

For this flower I used black velvet and lace with some pink and leopard print fabrics, finishing it off with a pink gem button and black feathers.


Wednesday, April 13, 2011

Flower Pin/Hairclip: Andrea

This flower is made using black velvet and lace with some purple fabrics added in. The center is a folded piece of organza that is tacked into place.


Wednesday, March 16, 2011

Flower Pin/Hairclip: Hailey

I made this flower with black cotton, black lace, and a shiny silver fabric.  In the center I put a rectangular jewelry part.  I thought that would make a great unusual look and feel.  I love it!  To me it reached "rock star" status!


Thursday, March 03, 2011

Frayed Edge Fabric Flower

 First select fabrics that you would like to use.  I keep a bin of scraps just for making these flowers.  Even tiny pieces are useful for the centers.  I'm just showing the steps I took to create this flower but I vary how I do it each time I create a flower so there is no set steps to take just a basic overall way of creating them.
 I like to take a stack of fabric that will act as my back layers of the flower.  This also varies in amount and size depending on the look and feel I want to end up with.
 I cut out a round-ish scalloped flower shape.  I don't use a pattern or guide I just eyeball it and cut scallops out in the form of a sort of circle.  You can always fix it as you go if a "petal" is too big or out of wack.
 This doesn't have to be exact in fact I like it to be imperfect or oval because as I stack them I can offset and rotate each layer a little different from the others.
 Crumple the cut out flower shapes and roll them in your hand like you would a piece of dough.  This helps fray the edges.  If they need extra fraying just pick at the edge with the tips of your finger.
 I start stacking, rotating, layering to form the flower.  I sometimes cut one flower shape a little smaller, and I always graduate the size from large to smaller towards the center of the flower.
 From here I go by how it looks and feels.  It's constantly changing as I add pieces of fabric.  I like to use triangle pieces too or long thing scraps sticking out of the layers.
 As you can see I added a couple of triangular bits and putting them under a layer of flower shaped fabric.
 I'm constantly adding to this stack and adjusting to create the flower.
 Here I cut out some smaller lighter pink flower shapes.
 Crumpled and rolled them to fray the edges.
 Now they are ready to layer.
 I added another triangle of fabric behind those as well.
 I realized they were a bit too small so I off set them to take up more space.  See it's not an exact science but just going with the flow.  If something doesn't work you don't have to use it.  Just put it back into your scrap bin for another project!
On top of this I add random bits and pieces some are rectangular some are pieces that were leftover from cutting out flower shapes.  You can add lace bits too or yarn, thread, anything to fill in the middle.
 I added in a larger light pink flower shape to the back layers since I felt it needed it.
 At this point I felt it was ready to be sewn together.
 I slide it under the foot of my sewing machine to the center of the flower.
 Lower the foot and sew a little line, reverse, forward and stop at the center with your needle down.  Lift the foot and rotate.  Lower the foot and sew forward, reverse, forward again.  To create an X in the center of the flower.
 The X is to sew all the layers and keep them in place.  Once you have that finished you can trim the thread tails off!
 As you can see it doesn't have to be perfect just functional.
 I then ruffle and crumple to puff up all the layers!
I then add a little something to the center, this time I used a large pearl, but I've used all kinds of things!  I've used buttons, a tassel created from metallic thread, lace, charms, sequins, beads, pretty much anything you can imagine or thing would look pretty in the center.  I've also attached feathers or leaf shaped fabric to the back too.  The possibilities are endless!
From here you can use it any way you'd like, sew it onto something or make it into a pin or hair clip by attaching findings to the back.
I hope this inspires you to create some flowers!  It got me saving all my tiny scraps, but you know it's neat to actually use those scraps instead of throwing them away!

Monday, February 28, 2011

Flower Pin/Hairclip: Krystal

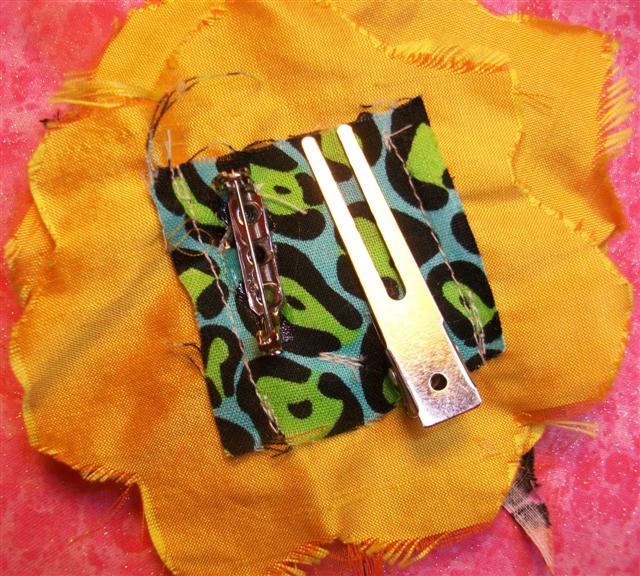
I have another flower for a birthday girl named Krystal!  Krystal's favorite colors are yellow and orange so I used a golden yellow silk fabric with some yellow and orange organza pieces and a leopard print that is pink/orange/black!
In the center is a red mother of pearl button with a green flower bead, a yellow flower bead, and a peach pearl in the center!  The center also dangles!
 I sew on a strip of fabric on the back and use it to attach the hair-clip and pin-backing with E6000 glue.

Friday, January 21, 2011

More Accessories!

Here's Kaity!  She has a very unique style and loved the idea of flower hair clips so we made a few and this is one of them.  She picked the fabrics and I layered them as she liked it and added feathers that she chose too.  At the time I didn't think to take photos of them (3 total) so I'll have to take photos as she wears them.  It was with her that I developed the new method for creating the flowers!
 These are the flowers that we made together for her set of boots!  She chose the fabrics for these too and I layered them to form the flower as she liked it.  In the centers is a green flower with a pale orange pearl.
Here's another photo of my boot accessories!  I added a "belt" of the red/white polka-dot fabric and pinned it around with the flower!

Thursday, January 20, 2011

Elizabeth's Flower Accessory

 Having fun creating her flower!!!
 Stitching on her leaf sequin and star button to the center!
Here is her creation!!!  We also attached a hair clip to the back.

Monday, January 17, 2011

Misc. Accessories

 Here's another flower I created using lace and a polka-dot fabric!
 Another hair accessory!!!  This one uses an beaded applique and a white feather and is attached to a bobby pin.
 I'm heading to winter camp with our youth group and me and another leader and her daughter all have the same snow boots so we needed some way to tell our boots apart.  So I created some small simple flowers that just have a safety pin on the back and can be attached anywhere on the boot!  My set will be the red flowers, the other leader's set is the black and white flowers, and the daughter is coming over to make hers!
I saw these scraps and thought they looked cute put together in this way...not sure what I will use it for but I just think it's a pretty ornament of some sort!