Showing posts with label Artistic Creations. Show all posts

Monday, November 09, 2015

Future Artistic Endeavors

Found some inspiration at Michael's! The purple gem with the Mermaid Tail sparked an idea for a Mystical Mermaid Treasure themed piece with an ancient old world feel with some sunken treasure! I can't wait to get to work on it! Abalone and Tarnished Silver inspired color theme!

I want it to be visual story that as you gaze at it you can dream up a story!  So you won't be seeing the mermaid herself!  I want that part of it to be left to the viewer's imagination.  I love art that invites me to daydream and I hope that I will be able to create something like that in this piece!

I still have the Wandering Rose Memorial to finish and another Series that I have an idea for as well that is more about capturing the experience of specific types of wine and visually translating that.  My idea for that one is that as you gaze at it you are feel like yup that is exactly how Merlot or Chardonnay or Champagne tastes and is like with all the nuances!  Very subjective but I'm excited about that series as well as this new Mermaid one!

Sunday, December 26, 2010

2010 ESD Enchanted Challenge: Fairy Treasure - Left Side of Piece

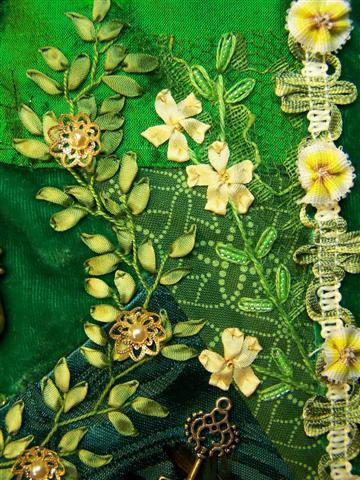
WOW there is a lot to explain!!! I'll start from the top, in the left top corner I created a bead embroidery vine. The vine stem is made with a metallic thread stem stitched on and then I added seed bead leaves with short bugle beads in the centers of the leaves. Then I added some little treasured items hanging from the vine! There are a couple keys, a piece from a necklace, and a couple of earrings! The Cameo earring is very special to me. I bought it in Italy with my allowance money when I was a kid(I think I was about 10 at the time)! I loved earrings when I was younger but now I never wear any at all! LOL I'm more a necklace girl now! LOL So I put this special memory onto this piece since it will be hung as art in my home!!!
I added a bit more to this motif since the last you saw it! I added some necklace parts and beads! You can also see the button cluster I added over the top of the hand dyed lace I incorporated around the piece to act as moss along with another key!
I like how in this photo you can see the path your eye travels up the metal flower motif to the green silk ribbon and bead flower motif, then up the button cluster to the beaded vine!
Now we are to the middle left of the piece!
I LOVE this metal flower motif!!! I knew I needed something there but at the time I didn't know what would be just right, when I saw a necklace I had that one of the rhinestones had fallen out of one of the flowers and I hadn't yet fixed it! I grabbed up the necklace and brought it over for tryouts...sure enough I loved the idea of it there! BUT it didn't work as is so what I did was take apart all the components of the necklace and place them how I thought looked best! I also added other metal bits and leaves that I have in my stash to complete the motif! It took a lot of stitching using invisible thread to get ALL the little parts sewn down into place!!!
I found a beautiful set of keyholes with keys and this keyhole was one of my faves! I sewed it on with a little bit of silk velvet behind the hole.
You can see a gorgeous green gem that I tucked in on top of the silk velvet patch just below that is a cretan stitch seam treatment in another of the challenge packet's threads which is a gold silk thread! Over the top is part of a bellflower vine motif!
For the bellflower vine I used a vine trim that I sewed down using a running stitch in a gold metal thread along the stem. Then I added bellflower bead-caps with crystal beads in the centers.
Now we are to the lower left of the piece! You can see a good view of the bellflower vine wandering in this section!
I added rhinestones to the center of the little flower motif I blogged about here. I think they added a touch of that extra sparkle I love! I also added one of my favorite little bee beads!
I also added some extra green feather stitching to this bottom patch along with a set of pearl earrings! I got a whole set of pearls (necklace, bracelet, earrings) for Christmas one year but I don't wear earrings anymore so these found the perfect home on Fairy Treasure!

Monday, November 22, 2010

2010 ESD Enchanted Challenge: Fairy Treasure - Right Side of Piece

The lower right got a little more added than the last time I posted about it. It now had a couple of keys tucked in and the scallop seam treatment has a bit more added to it.
Along the right edge I put a piece of dyed lace to act as moss and a double sequin butterfly.
Here is a closer look at the fern with the 2 keys tucked in around it!
The scallops got a fine lazy daisy and stright stitches in between them and some beaded leaves on the rounded parts. I also added some little yellow Fargo Flowers (not the same as the Sweet Heart Rose but similar) from JBM's Floral Stitches book on page 94.
Here is a closer look at the crystal heart "necklace" I added using one of the challenge fibers that is couched down with a gold thread in tiny running stitches. A couple more double sequin butterflies are fluttering about it as well!Here's a look at the fluttering of double sequin butterflies! What I did was use 2 of the same shaped sequin and overlapped them. Underneath is a gold one and over it is a clear one which calmed the tone of the gold and even added a greenish tinge making the butterflies just perfect!
You can also see another key tucked in this area. I also added some green feather stitches as background greenery.
I added a large vine that I created by a feather stitch wandering about and then I added ribbon stitch leaves to each arm and then added gold bead caps with gold pearls for flowers.
I added a piece of feather trim with another key tucked in on top of it. Also below the feathers is a fancy button on top of some rushed fiber from the challenge package.
I added a gorgeous bee buzzing about and above the bee is a seam of cretan stitch in shiny gold thread.
I added a little floral motif over the top of some more of the dyed lace acting as moss. The motif is made using stem stitch for the stems, lazy daisies as the leaves with seed beads added to the centers, and for the flowers is 5 petals of ribbon stitch with a slight loop left on the tips and a gold seed bead in the center.
I tucked in a bit more feather stitching at the top. In the center is a Keyhole that I added gold glitter to the center since I didn't like what was in the center previously. I think the glitter adds the the magical feel!
To the left of the keyhole is a piece of hand dyed lace and a string of pearls. The original set of pearls was too large so I removed the clasp and added my own gold pearls and sewed it all down!
WOW that was a lot to look at and explain!!! And yet I still have so much more to share!!!
More to come...

Tuesday, November 09, 2010

2010 ESD Enchanted Challenge: Fairy Treasure - Center Motif

Well, here's a better look at the center motif! You can click on any of the photos to see them larger.
This was the last part of the whole block I worked on which made it difficult but I don't really see how I could have worked on it first. I needed the inspiration of the whole block to really know what I wanted to do there! Sometimes you just can't control how your creative process flows no matter how badly you want to! LOL And even after leaving it for last I had a vague idea of what I wanted but no solid ideas to get it done. Then I finally got the idea to place vintage earrings around and put foliage in around them. The problem was I had run out of vintage jewelery!!! So I went to my local antique store and found some pieces that looked great in the area. Some of the earrings needed the large clip on backs taken off so that they would sit on the block well. My husband used his Dremel to remove them! ♥
I also used some vintage marquee shape montees and a large rhinestone.
For the foliage I used 2 shades of green silk ribbon and worked them in a french knot with a loop left at the top. Usually with that combination stitch there is an added french knot in floss added to make a little flower. I also created a few of those flowers as you can see in the above photo. All those knot/loop leaves were a pain to create for sure! LOL They are very finicky and can get snagged and pulled too tight too easy, but that was the look I wanted and so I trudged on creating them!
I also created a couple long leaves on each side with the same ribbon in a long twisted ribbon stitch that I couched with a little seed bead. The flowers I created to go with them are created using 3 straight stitches with 2 colors ribbon and the stems made with one strand floss with a french knot at the base of the flower.


Friday, November 05, 2010

2010 ESD Enchanted Challenge: Fairy Treasure - FINISHED!!!

Well I'm all finished!!!!!!!!!!!!!! YAY!!! I just sent off all the photos to Carolyn!
For now I'll just put these large overall photos and one of the middle and I'll start blogging more detail! I kinda fell off of blogging as I went for a while, life got pretty crazy and when that happens you can only do as much as you can do! My priority was at least to keep working so I could get it finished in time. So now that I'm finished, and things are starting to settle down I'll start blogging the details of this piece!
I'm so thrilled how it turned out!!! It's so special! To finish it I hand sewed silk velvet strips on and mitered the corners by hand and then hand sewed the floral trim in place as well. It's being framed so the velvet is the matting.
If you look closely you will find all kinds of special things, jewels, earrings, keyholes, keys, bees, butterflies, flowers, lockets and buttons! I did a lot of new to me techniques and streatched myself by creating motifs and flowers that are not my typical go-to flowers!
I used lots of vintage jewelery, the center has earrings all around with loop-knot leaves and sweet flowers tucked in.
Click on the photos to see each them closer!