WOW there is a lot to explain!!! I'll start from the top, in the left top corner I created a bead embroidery vine. The vine stem is made with a metallic thread stem stitched on and then I added seed bead leaves with short bugle beads in the centers of the leaves. Then I added some little treasured items hanging from the vine! There are a couple keys, a piece from a necklace, and a couple of earrings!
The Cameo earring is very special to me. I bought it in Italy with my allowance money when I was a kid(I think I was about 10 at the time)! I loved earrings when I was younger but now I never wear any at all! LOL I'm more a necklace girl now! LOL So I put this special memory onto this piece since it will be hung as art in my home!!!

I added a bit more to this motif since
the last you saw it! I added some necklace parts and beads! You can also see the button cluster I added over the top of the hand dyed lace I incorporated around the piece to act as moss along with another key!

I like how in this photo you can see the path your eye travels up the metal flower motif to the green silk ribbon and bead flower motif, then up the button cluster to the beaded vine!

Now we are to the middle left of the piece!

I LOVE this metal flower motif!!! I knew I needed something there but at the time I didn't know what would be just right, when I saw a necklace I had that one of the rhinestones had fallen out of one of the flowers and I hadn't yet fixed it! I grabbed up the necklace and brought it over for tryouts...sure enough I loved the idea of it there! BUT it didn't work as is so what I did was take apart all the components of the necklace and place them how I thought looked best! I also added other metal bits and leaves that I have in my stash to complete the motif! It took a lot of stitching using invisible thread to get ALL the little parts sewn down into place!!!

I found a beautiful set of keyholes with keys and this keyhole was one of my faves! I sewed it on with a little bit of silk velvet behind the hole.

You can see a gorgeous green gem that I tucked in on top of the silk velvet patch just below that is a cretan stitch seam treatment in another of the challenge packet's threads which is a gold silk thread! Over the top is part of a bellflower vine motif!

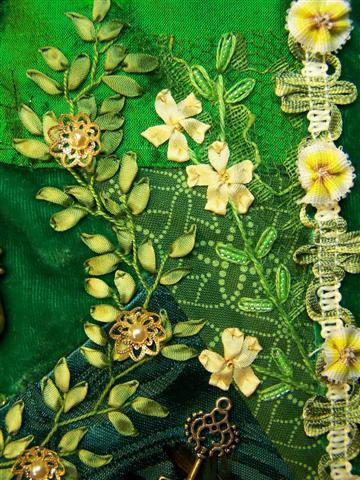
For the bellflower vine I used a vine trim that I sewed down using a running stitch in a gold metal thread along the stem. Then I added bellflower bead-caps with crystal beads in the centers.

Now we are to the lower left of the piece! You can see a good view of the bellflower vine wandering in this section!

I also added some extra green feather stitching to this bottom patch along with a set of pearl earrings! I got a whole set of pearls (necklace, bracelet, earrings) for Christmas one year but I don't wear earrings anymore so these found the perfect home on Fairy Treasure!
 WOW there is a lot to explain!!! I'll start from the top, in the left top corner I created a bead embroidery vine. The vine stem is made with a metallic thread stem stitched on and then I added seed bead leaves with short bugle beads in the centers of the leaves. Then I added some little treasured items hanging from the vine! There are a couple keys, a piece from a necklace, and a couple of earrings! The Cameo earring is very special to me. I bought it in Italy with my allowance money when I was a kid(I think I was about 10 at the time)! I loved earrings when I was younger but now I never wear any at all! LOL I'm more a necklace girl now! LOL So I put this special memory onto this piece since it will be hung as art in my home!!!
 I added a bit more to this motif since the last you saw it! I added some necklace parts and beads! You can also see the button cluster I added over the top of the hand dyed lace I incorporated around the piece to act as moss along with another key!
 I like how in this photo you can see the path your eye travels up the metal flower motif to the green silk ribbon and bead flower motif, then up the button cluster to the beaded vine!
 Now we are to the middle left of the piece!
 I LOVE this metal flower motif!!! I knew I needed something there but at the time I didn't know what would be just right, when I saw a necklace I had that one of the rhinestones had fallen out of one of the flowers and I hadn't yet fixed it! I grabbed up the necklace and brought it over for tryouts...sure enough I loved the idea of it there! BUT it didn't work as is so what I did was take apart all the components of the necklace and place them how I thought looked best! I also added other metal bits and leaves that I have in my stash to complete the motif! It took a lot of stitching using invisible thread to get ALL the little parts sewn down into place!!!
 I found a beautiful set of keyholes with keys and this keyhole was one of my faves! I sewed it on with a little bit of silk velvet behind the hole.
 You can see a gorgeous green gem that I tucked in on top of the silk velvet patch just below that is a cretan stitch seam treatment in another of the challenge packet's threads which is a gold silk thread! Over the top is part of a bellflower vine motif!
 For the bellflower vine I used a vine trim that I sewed down using a running stitch in a gold metal thread along the stem. Then I added bellflower bead-caps with crystal beads in the centers.
 Now we are to the lower left of the piece! You can see a good view of the bellflower vine wandering in this section!
 I added rhinestones to the center of the little flower motif I blogged about here. I think they added a touch of that extra sparkle I love! I also added one of my favorite little bee beads!
 I also added some extra green feather stitching to this bottom patch along with a set of pearl earrings! I got a whole set of pearls (necklace, bracelet, earrings) for Christmas one year but I don't wear earrings anymore so these found the perfect home on Fairy Treasure!