Thursday, March 03, 2011

Frayed Edge Fabric Flower

 First select fabrics that you would like to use.  I keep a bin of scraps just for making these flowers.  Even tiny pieces are useful for the centers.  I'm just showing the steps I took to create this flower but I vary how I do it each time I create a flower so there is no set steps to take just a basic overall way of creating them.
 I like to take a stack of fabric that will act as my back layers of the flower.  This also varies in amount and size depending on the look and feel I want to end up with.
 I cut out a round-ish scalloped flower shape.  I don't use a pattern or guide I just eyeball it and cut scallops out in the form of a sort of circle.  You can always fix it as you go if a "petal" is too big or out of wack.
 This doesn't have to be exact in fact I like it to be imperfect or oval because as I stack them I can offset and rotate each layer a little different from the others.
 Crumple the cut out flower shapes and roll them in your hand like you would a piece of dough.  This helps fray the edges.  If they need extra fraying just pick at the edge with the tips of your finger.
 I start stacking, rotating, layering to form the flower.  I sometimes cut one flower shape a little smaller, and I always graduate the size from large to smaller towards the center of the flower.
 From here I go by how it looks and feels.  It's constantly changing as I add pieces of fabric.  I like to use triangle pieces too or long thing scraps sticking out of the layers.
 As you can see I added a couple of triangular bits and putting them under a layer of flower shaped fabric.
 I'm constantly adding to this stack and adjusting to create the flower.
 Here I cut out some smaller lighter pink flower shapes.
 Crumpled and rolled them to fray the edges.
 Now they are ready to layer.
 I added another triangle of fabric behind those as well.
 I realized they were a bit too small so I off set them to take up more space.  See it's not an exact science but just going with the flow.  If something doesn't work you don't have to use it.  Just put it back into your scrap bin for another project!
On top of this I add random bits and pieces some are rectangular some are pieces that were leftover from cutting out flower shapes.  You can add lace bits too or yarn, thread, anything to fill in the middle.
 I added in a larger light pink flower shape to the back layers since I felt it needed it.
 At this point I felt it was ready to be sewn together.
 I slide it under the foot of my sewing machine to the center of the flower.
 Lower the foot and sew a little line, reverse, forward and stop at the center with your needle down.  Lift the foot and rotate.  Lower the foot and sew forward, reverse, forward again.  To create an X in the center of the flower.
 The X is to sew all the layers and keep them in place.  Once you have that finished you can trim the thread tails off!
 As you can see it doesn't have to be perfect just functional.
 I then ruffle and crumple to puff up all the layers!
I then add a little something to the center, this time I used a large pearl, but I've used all kinds of things!  I've used buttons, a tassel created from metallic thread, lace, charms, sequins, beads, pretty much anything you can imagine or thing would look pretty in the center.  I've also attached feathers or leaf shaped fabric to the back too.  The possibilities are endless!
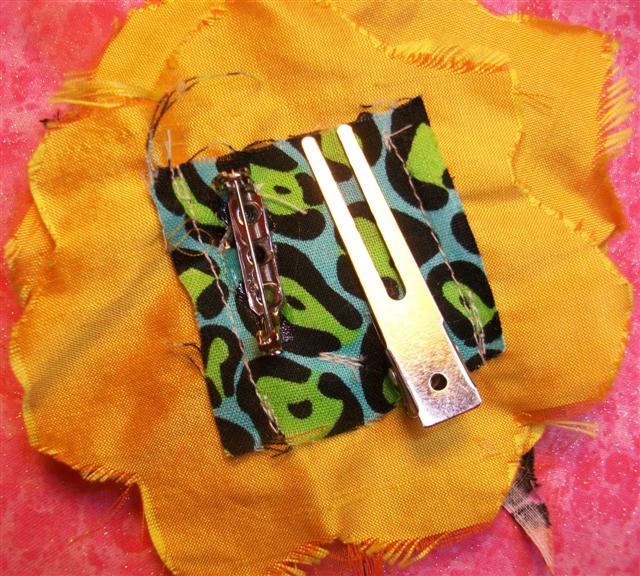
From here you can use it any way you'd like, sew it onto something or make it into a pin or hair clip by attaching findings to the back.
I hope this inspires you to create some flowers!  It got me saving all my tiny scraps, but you know it's neat to actually use those scraps instead of throwing them away!

Wednesday, March 02, 2011

Cell Phone Pouch

 Lilla has a tutorial on her blog for how to make a folded fabric pouch so I learned how to make it and then created a pouch for my cell phone!!!  I just got a new phone for my birthday and I don't want it to get scratched in my purse so this was a great solution...and pretty! ;)
I used my own measurements for the pouch though so that it would fit my phone well. I used a 25inches long strip by 4 inches wide. The finished size is 5x3.5, my wonderful hubby helped me figure out the math! LOL
 I added a liner of microfiber.  I didn't know any other way other than just sewing up a liner and then blind stitching it into place.  I used a microfiber cloth bought from the 99cents store and cut it up.  I figure this way it's a soft cleaning lining that is a little cushion too.
 Here is the back you can't even see the tiny stitches to sew in the lining.  I wish I had lined up the print better so it would be seen on the back too but I'm not good at guessing those things and it was my first time sewing something like this up.  I'll need practice to be able to do it better.
 On the front I added some vintage laced to the flap as I sewed it up.  Then as a closure I used a bracelet toggle clasp set of a hummingbird and a wreath.  It's perfect not too much trouble to use and it doubles as a pretty embellishment too!

Monday, February 28, 2011

Flower Pin/Hairclip: Krystal

I have another flower for a birthday girl named Krystal!  Krystal's favorite colors are yellow and orange so I used a golden yellow silk fabric with some yellow and orange organza pieces and a leopard print that is pink/orange/black!
In the center is a red mother of pearl button with a green flower bead, a yellow flower bead, and a peach pearl in the center!  The center also dangles!
 I sew on a strip of fabric on the back and use it to attach the hair-clip and pin-backing with E6000 glue.

Sunday, February 27, 2011

My Nephew Tristan

 My nephew Tristan with the blankets I embellished for him!!! Isn't he cute!!!

Tea Party Piece: Starting the Applique

 Okay I finally got to sewing all the blocks together marking the 18 inch square and sewing this large block onto a piece of muslin!  It's not perfect but you know I have to focus on the fact that no one will ever know once it is embellished!!!  I am definitely NOT a seamstress...but I do need a canvas to work on and so I love crazy quilting for the creative embellishment and needlework aspect more than the sewing!!! LOL
 I made copies of the teapot, sugar, and creamer cut them out a bit and placed them overlapping how I wanted them to be.  I wanted them to be a little over sized for the middle block and you can see just the tips and handles are poking out.  I taped them together and drew in the lines that were being overlapped.  I then made a copy of that to use for tracing and cutting out all the fabric pieces.
 I needed some way to keep track and know where each piece was to be placed and in what order so I used some quilters paper and traced the design onto it.  I marked the order of layering of the pieces, and I also basted the paper into place.  I'm not sure how I'll do this I'm just winging it as I go I think I'll tear away the excess and baste as I go etc. to keep things in place.  I've never done applique like this before and I kind of feel out of my element but I'll learn something new as I do this and wing it as I go.  There's not really any rule book for how to applique onto crazy quilting...LOL!
 I used a lightbox with the copied design to trace each piece onto fabric and cut it out.
Here are all the pieces!!!  Isn't it cute!!!  I picked matching fabric only for the lid and foot of the teapot and handles and feet of the creamer and sugar.  The body of the teapot is a different fabric from the creamer and sugar.  I like my tea things to compliment but not be too matchy-matchy.  Plus how would you see the different items if they were all the same fabric?
Now to start actually appliqueing everything into place...wish me luck...I think I'm going to need it! ;)
P.S. If anyone has any tips or ideas for how to do this better, please let me know!

Saturday, February 26, 2011

Amanda's Crazy Quilt Heart

 Amanda wanted to make something special for a gift and wanted to make something Crazy Quilted and loved the idea of a heart.  It was also near Valentine's Day so it was perfect.  The giftee loves purple so she chose all purple fabrics!

 Next came embellishments she sewed all the things that could be by machine first like the lace, fabric flower, bow, crochet heart, etc.  Then we put it in a hoop and she hand sewed on the little bits that couldn't be done by machine like the buttons and sequins.

 After the embellishments were done we cut out the heart and then took bits of lace to sew by machine around the edges to make it a nice finished heart!
 This is the heart finished after sewing the lace around the outer edge!
After that I gave her the suggestion of maybe adding feathers and she LOVED that idea so here is the final result with a bit of feathers peeking out from behind one corner!
And it just goes to show how you can create a wonderful crazy quilt project without using ANY embroidery!  Yup it's all embellishments of lace, buttons, sequins, feathers, eyelash yarn, and some fabric bits to create the flower in the upper right!

Saturday, February 12, 2011

Tea Party Piece: Coming Together!

  After each block was pieced I basted them outside the 6 inch block line and then cut them down to 7 inch blocks which will give me a nice and large seam allowance to sew them together!
Once I cut them all down I started playing with placement and this is what I ended up deciding on!  I just fiddle, flip, turn, and switch the blocks until I feel everything is as balanced as it can be!
I also love to see the photo at this stage it gives me a better "birds eye view" and overall feel!
I'm really adoring this piece it just feels so cheerful and sweet the perfect atmosphere of a tea party with dear friends!
Now that I think of it, I think this is a good description of the reason why I didn't piece any tea prints into my blocks.  I like that the fabrics in rose prints, pinks, and greens give an "atmosphere" for building a tea party with embellishments.  This way I don't have to worry about covering over tea prints with embellishments too.
In this photo you can see I cut out the prints of tea cups which I plan to applique on the piece.  This is just a "tryout" to give me an idea of how I'll do things.  I'm hoping that the prints will look okay when I applique them in place.  I'm a little worried because of the gold lines, I think I'll have to try to applique up next to them but not right on them...hmm sounds tricky...we shall see.
The rose print fabric I have folded in the center is what I'm considering making the teapot out of.  Once I have all the blocks sewn together I will work on the center applique of a teapot and creamer and sugar.  Then I'll probably applique all the teacups on and start embellishment.
Wow this piece is HUGE but I love it, it's going to be so fun to work on!  I'm also thinking of getting a huge quilters hoop to work on this...we'll see how that goes too!

Tea Party Blocks Being Pieced: The Rest

 Here are the remaining 5 of 8 blocks!  Now I've just got to sew them all together to create one large piece.  Normally people embellish each block and then sew them all together but just like with Fairy Treasure I want this one to have that same whole-cloth feel instead of a separate blocks feel. So that is why I'm going to sew them all together first!  There are pros and cons to each method and for what I want the pros weigh in favor of sewing them together FIRST! LOL


Monday, February 07, 2011

Tea Party Blocks Being Pieced

 Here's a bunch of fabrics I picked out for piecing.  Usually I do that using an inspiration fabric which is the rose fabric I'm using as the center of each block.  I don't usually use all the fabrics I pick out but I like to have the options as I do piece and I try to have unity for the blocks. As I started I ended up leaving out the yellow fabric and a couple of fabrics that didn't feel right after all.  So far I've pieced 3 of 8!
I also finally got the Teapots 2 to Applique book and I have an idea to have a Teapot with a creamer and sugar in the center!  Then around the center will be teacups and tea things and goodies!!!  This is going to be so much fun!!!  Also I'm thinking of using my inspiration rose print fabric as the main body of the teapot, we will see how it goes!
 The piece of Dupioni silk fabric on the bottom of this block is really neat it's both green AND pink at the same time!!!  So sometimes you see more green other times you see more pink but usually you see green with a tinge of pink like this photo!