Showing posts with label Applique. Show all posts

Tuesday, October 21, 2014

Wandering Rose Memorial: Applique Quote

 I really wanted to add the quote "Always remember you're braver than you believe, stronger than you seem, smarter than you think, and twice as beautiful as you'd ever imagine." because I really strongly feel that it summed Wendy up so well of who she is and what she would want each person to know about themselves that I just had to figure out a way to incorporate it.

I used Microsoft Word to get the Font and Shape and printed it out.  Above is the test print.  Below is the final print onto fabric.
I tried different fabrics and settled on this printed cotton.  I also had to change the type to bold so that enough ink would transfer to the fabric.  I loved this rose print, it's perfect for this!  And it was the last bit of this fabric that I have in my stash so I was really happy it printed perfect onto it since there's always a risk involved with this method of transfer.

The method I used was to simply print it on paper first and then tape a piece of fabric over the print and re-feed and print it onto the fabric.  I then iron it and give it a shot of steam to help set the ink on the fabric.

Here it is after I appliqued it into place, I plan on embroidering around it later on.  I want to work on more seam treatments before I embroider around it though.

Monday, January 14, 2013

CQJP 2013: Teapot Details

I am so loving the teabag tag!!!  So the little details that have been added is stitching all along the edges in a brown thread.  I think it helps, though not as much as I would have liked.  Then I did some tiny back stitching in the same thread along the lid and top of pot area.  That helped give it more dimension the lid fabric lays more flat and the pot fabric puffs to make it look more 3D.

For the teabag tag I took a couple of fabrics, a criss-cross print and a words print, and ironed on some normal interfacing then cut out the squares to give me clean edges with a more paper-like feel.  Then I took a couple of tiny stitches on the 2 ends with clear thread to hold the pieces together.  Next I used some size 80 white tatting thread for the string.  Took a couple of stitches at the top of the tag which holds it into place (conveniently covering the odd-ball red rose...muah hahaha), then took the thread back to the top and took a wrap at the top of those stitches and then under that loop and up to the top to let it "come out" at the lid.  The string is movable and the tag can flap!  And I love that "Love" is on the tag...it's so cute!!!

OH an seeing that cute criss-cross fabric makes me think of wafer cookies!!!  Future idea in the making!!!  This little Tea Book is going to be so cute!!!  I'm getting more and more ideas, maybe a tag or something that says "Brew The Tea" or "First Brew The Tea"...I love how the fabric books have little sayings in them that go with the images in the pages.

And is it just me or am I the only one that thinks it's proper to brew the tea in the pot NOT the cup!  LOL  I always think it's so wrong for just hot water to be in the pot and teabags be set out for the teacups...that method is for MUGS where you don't use a teapot!!! LOL  Just my opinions on the subject...just in case you wanted to know...HAHAHA ;-)  And I don't just use bags I'll do both loose and bags, it's true, loose tea is better!  LOL

Sunday, January 13, 2013

CQJP 2013: Teapot Applique Finished

Ok so last night I buckled down and finished the applique! Once I finished the handle, the top handle needed it too, but that tiny little thing gave me the most grief! If you look closely it's chewed up, the fabric pretty much shredded. So now I'm ready to stitch around it and see if that helps clean it up. I have a feeling it will do the trick nicely and make me very happy with this little teapot applique. Off to stitch I go!

Saturday, January 12, 2013

CQJP 2013: Teapot Applique

Finally I finished the outer edges...and I thought I was done and then I realized...yup I need to do the inside of the handle too.  So now I'll work on that.  I'm dreaming of seams of little tea cakes...I want to get on to that part!!! LOL  I also am going to take some brown thread and stitch around the edges...they aren't pretty so that will help them look nice and it look like the lines used to draw the teapot in the print too.

All this trouble has made me realize I can't tolerate doing tons of applique and I'm looking into other ways to attach them to my future blocks rather then the torturous tedious tiny applique of these prints I want!  LOL  So I'm looking into some double sided interfacing that I can iron onto the back of the print, then cut it out, have no fraying, and then iron them into place.  And now I totally understand why this stuff was invented!!!  LOL  Ya know even having interfacing on the back of the applique that you are going to sew down would help with the fraying ends of the fabric that you have to tuck under would be amazing!

But for now I don't want to tuck any more edges under...  One more tiny part to go...I can do it...ok...heh...ugg...meh...(Hows that for melodramatic?)...ok...here I go...LOL  If I finish it off tonight, tomorrow I can work on the fun stuff!  LOL  I have to bribe myself!  LOL

Wednesday, January 09, 2013

CQJP 2013: Slow Progress

Here's a quick photo from my phone. I am slowly working on the teapot applique. My hands don't like doing it for long, and it's really fiddly. I don't know what I could do to make it easier. I guess working in little bits is the way to go.
Also I am not sure if I should cut out the spaces in the lid handle and pot handle or leave them. The space of each handle is so small that I didn't think it would be practical.

Thursday, January 03, 2013

CQJP 2013: Block 1

 Today I pieced together my 6 inch block for this month!  I am not sure I'll keep the same color theme each month, but I do know it will be "Tea".  LOL

I have an idea for turning each block into a page though!  I will turn each block into an applique using This Method I use for hearts, and then so the same to a square of fabric and then place them back to back sandwiching some bits of lace and such out the edges.
 I figured for this block I would do a Teapot so I cut out this pretty one from a teapot print.  It's all clipped and ready to applique down.  Next is simply to get that applique done!
The Teapot needed a Doily so I found a little one in my stash and cut it out in a crescent shape and sewed down the raw edge.  It will be nicely hidden behind the teapot applique.

I promise that piece of fabric in the lower left is not really how it looks in the photo...LOL...it's not purple at all but a hot pink and similar to the top piece.  And the top piece is a little more soft and matching with the other pinks too.  It's always annoying to me that it's so hard to capture accurate photos of the pieced fabrics, with all the differences in sheen, texture, and fabric types.  I just have to keep going anyway.  You'll just have to trust me that the colors do indeed go together well!  LOL  My worry is that red rose on the teapot...not sure how I'll deal with that, but I will think of something because I do NOT want to add red into the mix...

Thursday, November 08, 2012

Tea Party: Applique Update

Wow it's been a crazy long time since I posted about this Tea Party CQ!  As you can see I have been working on it but it's only a little bit for how long it's been.  I have 5 of the 8 tea cups appliqued down only 3 left!  The teapot is crazy, and I found myself not wanting to work on it at all so I switched to the cups.  It's hard for me to only work on applique and not be doing the more creative stuff, but I have to finish the applique first so I can get to the fun stuff.

Wednesday, May 16, 2012

Baby Gifts!

Here is a little bib that I added a applique strawberry and back-stitched in a "R".
This monogram I just used an air-erasable quilters pen and roughly drew an "R" then I feather stitched in the shape.  Next I added lazy daisy in one color of pink and then a second lazy daisy in the inside of that one in another shade of pink.  Last I added tiny lazy daisy leaves.
Receiving Blanket with Monogram
For this blanket I cut out 3 hearts out of flannel and then appliqued them on using different embroidery stitches.
I used chain stitching, blanket stitch, and running stitch with colonial knots placed in between.
On this bib I cut out a rose from a print and appliqued it into place.  Then I "quilted" in specific spots to define the rose even more.  Then I used an air-erasable quilters pen to write "Rosalee" and back-stitched it in.
I jazzed up a plain white bib, and with a name like Rosalee I couldn't resist a Rose Theme!
These butterflies are iron-on applique's...hey don't knock it, I messed up and in order to fix it the iron-on appliques hid the mess...LOL  Then I added a running stitch flight path.
Easy way to cute-ify a plain onesie!

Sunday, February 27, 2011

Tea Party Piece: Starting the Applique

 Okay I finally got to sewing all the blocks together marking the 18 inch square and sewing this large block onto a piece of muslin!  It's not perfect but you know I have to focus on the fact that no one will ever know once it is embellished!!!  I am definitely NOT a seamstress...but I do need a canvas to work on and so I love crazy quilting for the creative embellishment and needlework aspect more than the sewing!!! LOL
 I made copies of the teapot, sugar, and creamer cut them out a bit and placed them overlapping how I wanted them to be.  I wanted them to be a little over sized for the middle block and you can see just the tips and handles are poking out.  I taped them together and drew in the lines that were being overlapped.  I then made a copy of that to use for tracing and cutting out all the fabric pieces.
 I needed some way to keep track and know where each piece was to be placed and in what order so I used some quilters paper and traced the design onto it.  I marked the order of layering of the pieces, and I also basted the paper into place.  I'm not sure how I'll do this I'm just winging it as I go I think I'll tear away the excess and baste as I go etc. to keep things in place.  I've never done applique like this before and I kind of feel out of my element but I'll learn something new as I do this and wing it as I go.  There's not really any rule book for how to applique onto crazy quilting...LOL!
 I used a lightbox with the copied design to trace each piece onto fabric and cut it out.
Here are all the pieces!!!  Isn't it cute!!!  I picked matching fabric only for the lid and foot of the teapot and handles and feet of the creamer and sugar.  The body of the teapot is a different fabric from the creamer and sugar.  I like my tea things to compliment but not be too matchy-matchy.  Plus how would you see the different items if they were all the same fabric?
Now to start actually appliqueing everything into place...wish me luck...I think I'm going to need it! ;)
P.S. If anyone has any tips or ideas for how to do this better, please let me know!

Saturday, February 12, 2011

Tea Party Piece: Coming Together!

  After each block was pieced I basted them outside the 6 inch block line and then cut them down to 7 inch blocks which will give me a nice and large seam allowance to sew them together!
Once I cut them all down I started playing with placement and this is what I ended up deciding on!  I just fiddle, flip, turn, and switch the blocks until I feel everything is as balanced as it can be!
I also love to see the photo at this stage it gives me a better "birds eye view" and overall feel!
I'm really adoring this piece it just feels so cheerful and sweet the perfect atmosphere of a tea party with dear friends!
Now that I think of it, I think this is a good description of the reason why I didn't piece any tea prints into my blocks.  I like that the fabrics in rose prints, pinks, and greens give an "atmosphere" for building a tea party with embellishments.  This way I don't have to worry about covering over tea prints with embellishments too.
In this photo you can see I cut out the prints of tea cups which I plan to applique on the piece.  This is just a "tryout" to give me an idea of how I'll do things.  I'm hoping that the prints will look okay when I applique them in place.  I'm a little worried because of the gold lines, I think I'll have to try to applique up next to them but not right on them...hmm sounds tricky...we shall see.
The rose print fabric I have folded in the center is what I'm considering making the teapot out of.  Once I have all the blocks sewn together I will work on the center applique of a teapot and creamer and sugar.  Then I'll probably applique all the teacups on and start embellishment.
Wow this piece is HUGE but I love it, it's going to be so fun to work on!  I'm also thinking of getting a huge quilters hoop to work on this...we'll see how that goes too!

Thursday, January 06, 2011

Baby Stuff for Nephew Tristan

I took a plain Bib and cut out a cute lizard design from some fabric.
Sewed it into place...

How cute is that? But it needed something more...
So I cut out a 'T' from the same fabric and sewed it down too!
I also put 'T's on a couple of baby blankets too and embellished them! One got green flannel fabric with colorful buttons, and the other got pale blue flannel and a couple green flannel leaves with one little yellow button!
These got sent off to my sister who is expecting Tristan to arrive any day now!

Wednesday, November 24, 2010

Kid's Christmas Gift Pillows

My dear friend Wendy has 3 kids who ADORE handmade gifts! Seriously they love the handmade ones more than any toy, it's amazing! So I enjoy making gifts for them! Here are their pillows I created for them for Christmas, each one unique to them!
Joseph is the oldest so I used a Camouflage Flannel print and then Appliqued a bright green 'J' (which looks lighter in the photo it's more vivid in person) and I found a cool lizard print fabric that I cut out a couple of lizards from and one I appliqued on with the 'J' and the other I sewed into a stuffed toy!
Rebekah is the middle kid and loves all things girly and sweet! I used a sweet rose bud print flannel fabric for her pillow. Also I used a bit more of a fancy font for her 'R' and cut out a scene from a print in a oval shape and appliqued that on as well. The eye cover I bought and just set it on the corner, funny thing about Rebekah is she actually wears an eye cover when she sleeps!!! LOL I also thought it was neat that it had the word 'relax' on it that also starts with 'R' LOL!
Jeremy is the baby so I used a cute monkey print with a camouflage background flannel fabric for his pillow and I appliqued a bright banana yellow 'J'! Then I cut 2 of the monkeys out and sewed them into a little stuffed toy that I then attached to a "vine" of fuzzy yarn and sewed into the top seam of the pillow. That way the monkey won't get lost and he swings around playfully!

Friday, August 13, 2010

Monogram Tote Bag: R

Here is Robyn's tote bag! Her request was hearts so I cut out a bunch of hearts she also likes polka-dots so I coordinated different polka-dot prints with a floral print for the 'R'. Even the floral print has tiny little polka-dots as a background for the flowers! I also tied some eyelash yarn in a bow on the handle.
I used a heart for the hole of the 'R' as well to keep the heart theme going!
To add a little sparkle I sewed green and pink sequins on with invisible thread to polka-dot the inside of the 'R'.

Thursday, August 12, 2010

Monogram Tote Bag: L

Here is Leah's tote! For her's I chose a flower print for the 'L' and so I didn't want to cover it up. With that in mind I got the idea to cut out leaves and put them around the 'L'. I just cut out leaf shapes free-style in the green fabric and then cut out a second leaf shape to be either another leaf with it or a shadow to the green one, however you want to look at it. I just sewed them down by machine in the centers of the leaves using invisible thread.
I then got the idea to put a beaded edging around the 'L' which I just used the beaded back stitch (all by hand of course) and alternated a pearl with a tiny gold bead.
I also put a pretty floral gold heart bead on!

Monday, July 26, 2010

Monogram Tote Bag: E

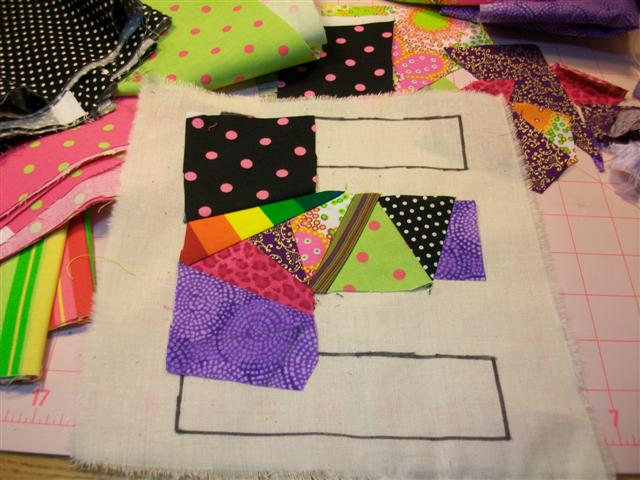
This Tote is for Elizabeth! She never has a favorite color for long because all the colors are her favorite! She also loves to do crafts etc. so I had to do her "E" crazy quilt style!
It was a bit of a challenge to piece being the odd shape it was! What I did was draw out the 'E' onto foundation fabric and then I started on the middle prong and pieced to the center and then went down and out the bottom prong and up and out the top prong. Of course I used ALL KINDS of fun fabrics because just like she likes all colors she likes all fabrics too! LOL
When I finished piecing I cut out the 'E' and sewed it onto the bag using the zig-zag stitch and a variegated green thread.
To embellish I sewed on a yellow butterfly applique, assorted buttons, a working locket she can add a photo to, a scissors charm, and a gold tone cross-stitch needle since it has a rounded tip!
I used a pink metallic thread and tied a knot at the end and a knot onto the end of the needle and put the knot on the top of the fabric to be seen and then did some running stitch randomly until I got the needle to where it would stay. Once in the spot I took beading thread and tacked down the eye so that the needle can't fall out!
It can't get any more perfect and fitting than that!
I just know she will love it!