Monday, July 26, 2010

Monogram Tote Bag: E

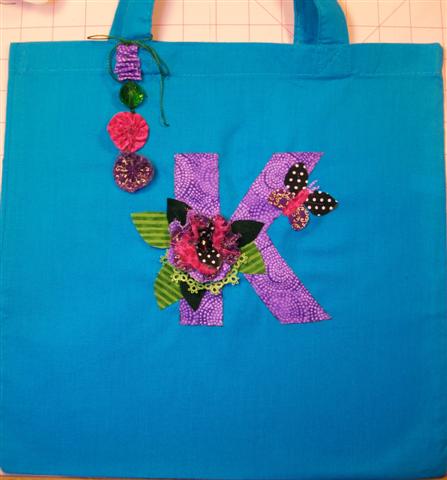
This Tote is for Elizabeth! She never has a favorite color for long because all the colors are her favorite! She also loves to do crafts etc. so I had to do her "E" crazy quilt style!
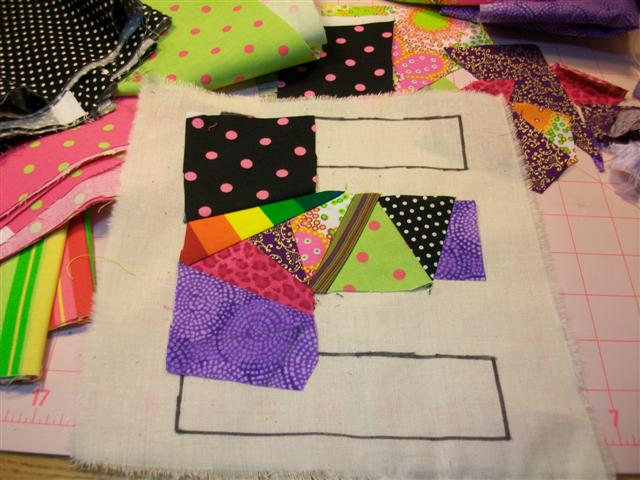
It was a bit of a challenge to piece being the odd shape it was! What I did was draw out the 'E' onto foundation fabric and then I started on the middle prong and pieced to the center and then went down and out the bottom prong and up and out the top prong. Of course I used ALL KINDS of fun fabrics because just like she likes all colors she likes all fabrics too! LOL
When I finished piecing I cut out the 'E' and sewed it onto the bag using the zig-zag stitch and a variegated green thread.
To embellish I sewed on a yellow butterfly applique, assorted buttons, a working locket she can add a photo to, a scissors charm, and a gold tone cross-stitch needle since it has a rounded tip!
I used a pink metallic thread and tied a knot at the end and a knot onto the end of the needle and put the knot on the top of the fabric to be seen and then did some running stitch randomly until I got the needle to where it would stay. Once in the spot I took beading thread and tacked down the eye so that the needle can't fall out!
It can't get any more perfect and fitting than that!
I just know she will love it!

Sunday, July 25, 2010

Monogram Tote Bag: A

Here is Ashlee's Tote! She said she loves purple and black combination so what I did was use a pale lavender with a pretty swirly print and contrasted it against the black and white polka-dot stars! I stitched it all down with invisible thread!
The dangle for the handle is a fancy black yarn that has shimmer too!
I added a cool vintage button to one star a darker shade of purple button with bugle beads to another star and added a little aqua button with a trail of silver seed beads to the last star!

Saturday, July 24, 2010

Monogram Tote Bag: K

Here is Kaity's Tote! Kaity loves the new Alice in Wonderland movie and loves the Mad Hatter so I used that as inspiration for her tote. She also loves purple!
For the dangle from the handle I created a faux fob with a bit of fabric I just running stitched along and gathered, a green bead, a yo-yo and a circular flower.
I stitched the "K" down with invisible thread, and created a shabby flower with scraps of fabric. I think the colors and frayed fabrics with the strip green leaves and the velveteen leaves and the green tatting are what make it look like something the Mad Hatter would make! I just cut out the leaves in the shape of a leaf and sewed them down the middle with the invisible thread!
The tote needed a little something more so I got the idea to make a patched butterfly too! I just winged it and cut out the shape of the wings in scraps and fiddled with placement, then sewed those down and then put the body piece over that and sewed down the middle. The little antennae I just cut a v shape scrap and snipped a v out the middle.
Don't you just love the shabby flower? The frayed pink print with the polka dot on top of the purples just seem too perfect and adding the tatting in too...!!! LOVE!

Friday, July 23, 2010

Monogram Tote Bag: F

Okay here is one of the tote bags I've been making, I had a marathon of them the last couple days since there are a ton of b-days coming up!!!
This one is for Fallon and she loves purple so I used the dark purple fabric with the gold swirl print for the "F". Then I took a fat quarter fabric that had some sweet prints of flowers on it and cut out the pretty purple flower. I also used a piece of lace from my bits'n'pieces stash. I sewed around all the edges using straight stitch setting and invisible thread! Don't let that fool you all the curves I had to go around on the flower...tons of work!
I added gold seed beads to the centers of the purple flowers and attached a metal butterfly!
The dangle from the strap is some eyelash yarn, ric-rack and white lace.

Thursday, July 22, 2010

Monogram Tote Bag: S

I did this monogrammed tote bag back in May for a birthday girl but never got a chance to blog it! LOL I also added a dangle to the strap but didn't get a chance to take a photo of it before it got gifted.
Stephanie LOVED it!
I just appliqued the black polka-dot fabric "S" with a zig-zag stitch with the raw edge then attached a couple of lace applique leaves and made a matching shabby-flower and attached it!
What I do for the monograms is search the fonts in Word until I find one that is simple and print it cut it out and then trace it onto fabric and cut that out! Easy!

Wednesday, July 21, 2010

2010 ESD Enchanted Challenge: Fairy Treasure - Puffy Silkie

I finished doing the split stitch border with green 4mm silk ribbon, then I stitched down the jewelery findings. Next I noticed that the silkie was a bit wrinkled and thought hmm it might look nice if it was puffed a bit so I tried it out!
I just snipped a slit in the foundation fabric behind the silkie and stuffed fiberfill in it and stitched it back up!
I like the effect it feels kind of like a brooch being oval and puffed like that with the pretty border!

Tuesday, July 20, 2010

2010 ESD Enchanted Challenge: Fairy Treasure - Sewn Together

Here's what Fairy Treasure is looking like all sewn together, I choose to sew all the blocks together before embellishment because I wanted a more wholeness effect rather than separate blocks and the best way to do that is to sew them all together first and then embellish from there as a whole piece. There is never a right or wrong way for crazy quilting only personal preference! Gotta love that!
It's really hard to photograph this piece with all the shades of green and surfaces of fabric the camera lens just doesn't see it the same as my eyes, some things look right and then other things look wrong so as I go along I'll be trying to figure out the best way to take photos too. Accurate photos always seem to be the thorn in my side! LOL Hey at least in these photos it seems that my textures turned out pretty well, you can see the texture of the silk velvet pieces really well which I purposely wrinkled up when piecing the blocks for the yummy soft effect.
I tacked the silkie down with invisible thread and then I started doing the split stitch around it with green silk ribbon. There are jewelery pieces that will be attached in spots over the split stitch boarder on the top-bottom-side-to-side, and from there I'll be creating vines coming out!
I'm trying to do as much as I can with this piece right away while I still have excitement fueling me because I know there will be times where I may get a little stuck and I want to give myself room to take my time during those moments without the deadline looming over me! LOL

2010 ESD Enchanted Challenge: Fairy Treasure - Keeping Me Company

As I work on my Fairy Treasure project Madie likes to snooze under my sewing machine desk! She was there while I pieced and sewed it together and even now when I embellish! She's keeping me company! ;)

Saturday, July 17, 2010

2010 ESD Enchanted Challenge: Fairy Treasure - Pieced Blocks

I finished piecing the blocks and got them cut to proper size today! I believe this is the final configuration and it's ready to sew together! I bought a few new green fabrics that I also included so some centers aren't the same as I originally planned, but I think it's better!
The rules stated to use half the fabrics included in the package and there were 13 pieces and I used 7 all six of the greens and the shimmery-striped fabric that the fairy silkie will sit on. It was for sure a challenge because some of the greens weren't my fave shades so I had a puzzle to mix and match all the different shades of greens. I love how it turned out with lots of texture.
I also cut out the silkie in an oval shape and I love how the leaf beads look around the edge! I need to buy another string of the leaf beads! LOL I'm also thinking of ways to add more foliage around the silkie too.
As for my little background story I think my fairy's name will be either Emerald or Peridot I can't make up my mind which, but Peridot is a more golden-green so I think it may fit better. Which do you all think her name should be?

Wednesday, July 14, 2010

2010 ESD Enchanted Challenge: Fairy Treasure

I just got my 2010 ESD Enchanted Challenge package in the mail!!! WOO I'm naming my mini-quilt "Fairy Treasure"! So excited to start working on it, I love all the greens I'm going to use for it! I just love the idea I got for the theme about lost treasures that this little fairy finds and is fascinated by so she gathers them and tucks them in safe little spots. And so this marks the beginning of a beautiful journey exploring her gorgeous green world!