 Jessica W. surprised me by adding this beautiful thread to her ornament swap package. I was already thrilled when I saw it and then I read the note she sent and found that she hand spun this beautiful silk thread herself! WOW! What a wonderful treat! It's got such a wonderful texture. I can't wait to use it, and I think the white one will go perfect on my white on white block! Thank you, Jessica!
Friday, October 27, 2006
Hand Spun Silk Thread
Jessica W. surprised me by adding this beautiful thread to her ornament swap package. I was already thrilled when I saw it and then I read the note she sent and found that she hand spun this beautiful silk thread herself! WOW! What a wonderful treat! It's got such a wonderful texture. I can't wait to use it, and I think the white one will go perfect on my white on white block! Thank you, Jessica!
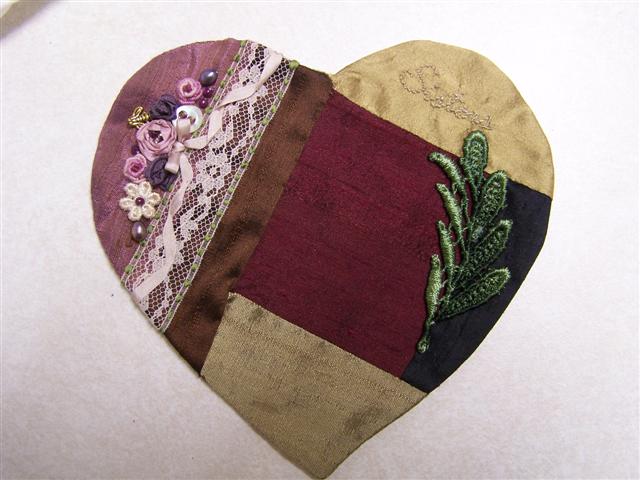
Tuesday, October 24, 2006
CQ Heart for my Sister: Finished
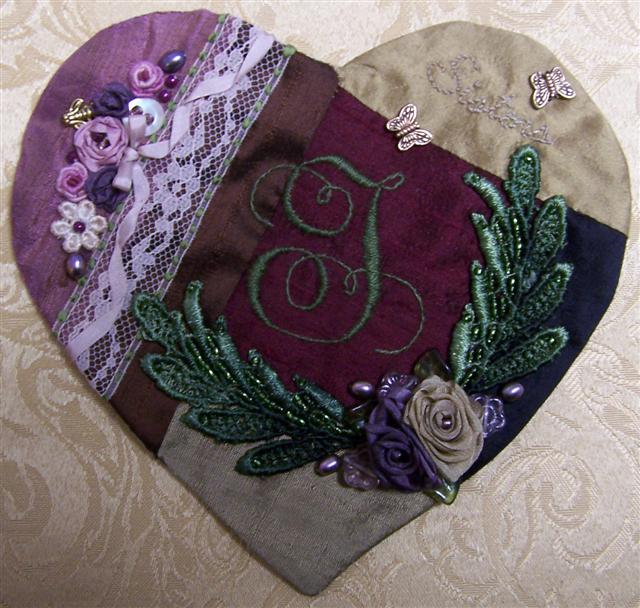
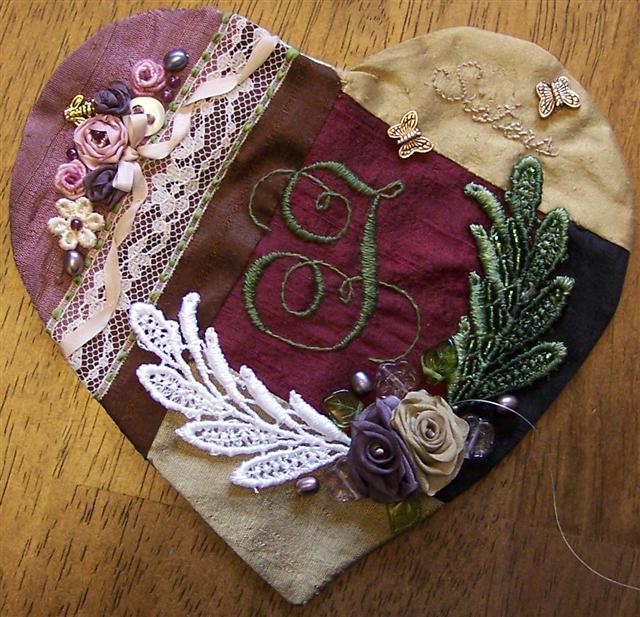
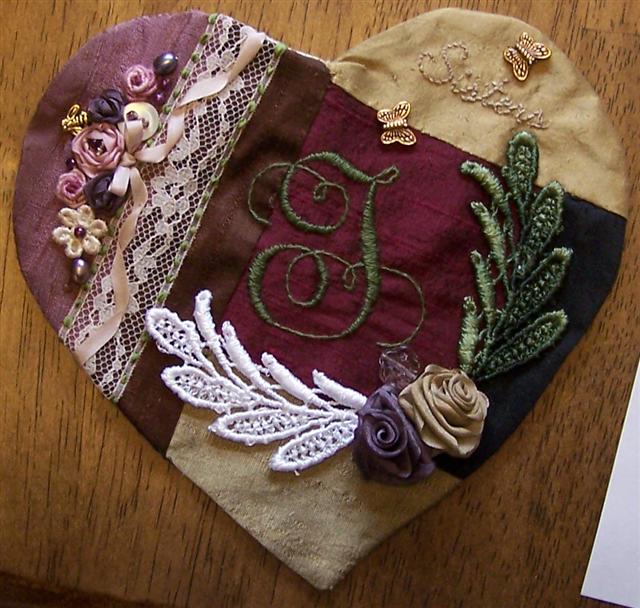
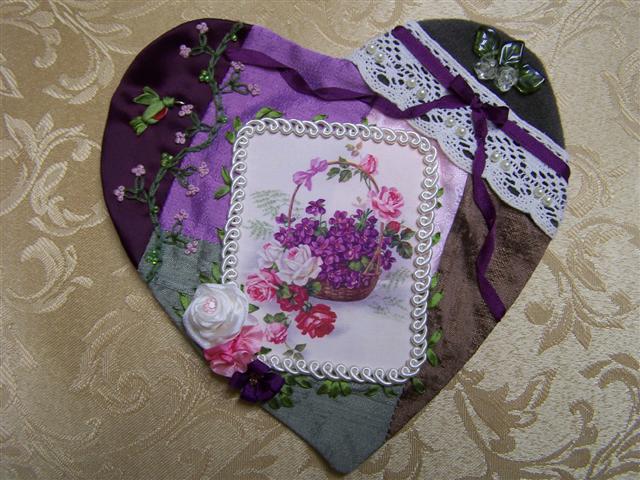
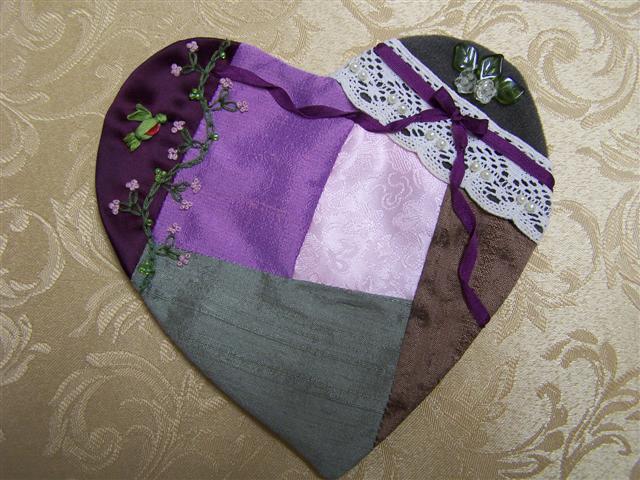
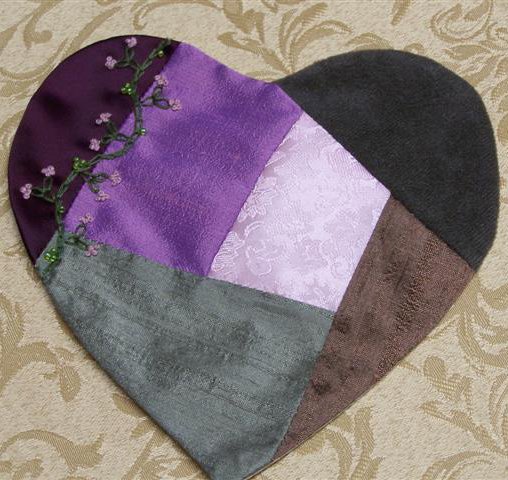
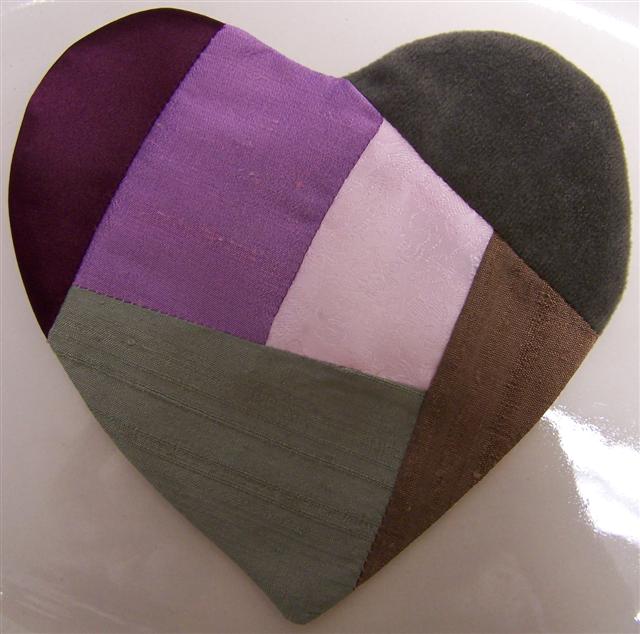
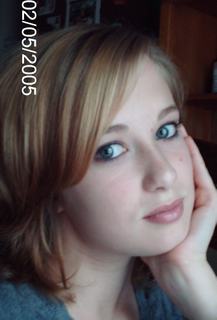 Click on the photo to see it closer. I dyed the 2nd leaf today and just finished the rest of the embellishing. The heart is finished and now ready to be mounted. I have a frame for it but it has to have no glass. I really love this heart too, I love the colors and fabrics and design of it. I like the 2 leaves too because it kind of looks like a hug! Also here is a photo of my sister. Isn't she beautiful? She will be 15 on 11 November, and this heart is for her birthday. I know she is going to love it.
Monday, October 23, 2006
White on White CQ Block
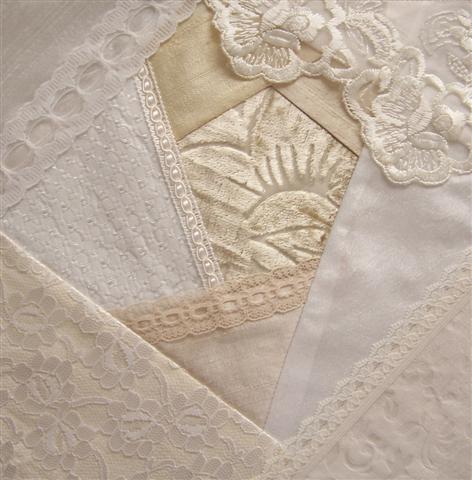
 Today I wanted to try a third 8 inch block and I've been wanting to try white on white, so that's what I made. It was a lot easier for me this time. Things went a lot more smoothly, and I was able to add more lace! It's got lots of texture too. I really love this block! Hey Lillian! You recognize that bit of lace up at the top?! Thank you!
Here is another photo of my second block, I hope you all can see the colors of it better.
Sunday, October 22, 2006
Second CQ Block
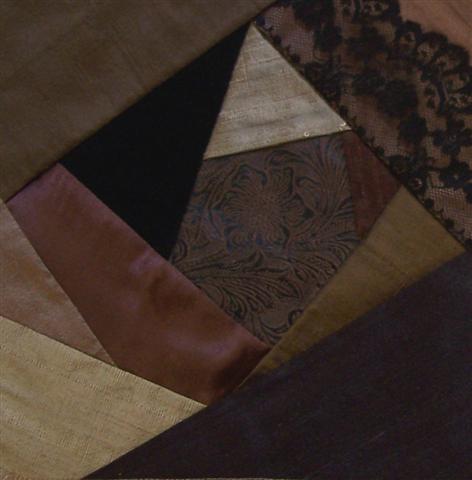
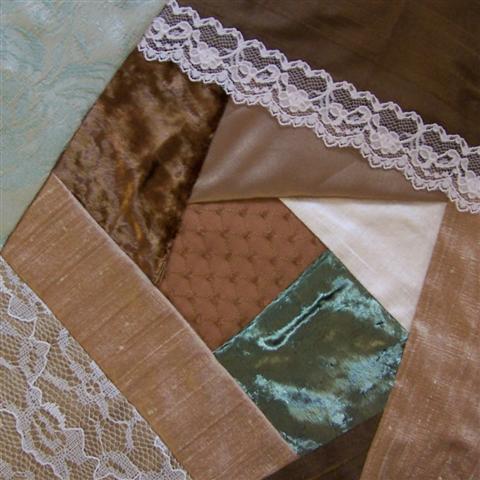
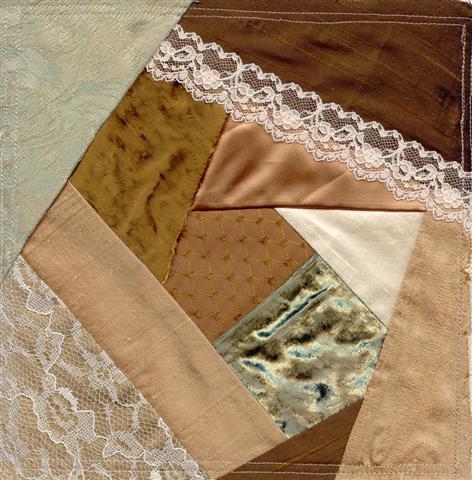
 Today I pieced together my second 8 inch block. I wanted a more antique feel. It reminds me of the old west. I used the middle faux leather for inspiration of the colors of the block. It's tough but not like leather, more near a suede type feel. Also I used a piece of black velveteen, a shiny brown material and the rest are silks, I just love how Dupioni silk looks. I had a better time piecing this block though than the last one. I guess having a better idea of what you are doing helps! LOL
The only thing that's giving me trouble with this block is the accuracy of the photo you are seeing. I just couldn't get the colors and textures to look right. This is as close as I could get. The lightest piece is a little darker it's really a black gold Dupioni silk, and at the bottom is a black brown Dupioni silk, in all the photos it looks purplish!
Saturday, October 21, 2006
Fabric
 Today me and my wonderful hubby went to Atlanta to the Fabric.com warehouse sale! We got an awesome deal on silk!!! We picked through the remnant table that was priced $12 a pound for the silk. I got a whole bunch! AND I found 1 yard of a color that I had gotten a swatch of and used in my sister's CQ heart (upper left of the heart) that I tried to order but it wasn't available anymore!!! YEAY! It's called chocolate rose! And it's as yummy as the name! It's the one on the top of all the fabrics. We had a lot of fun! When we got home we measured it all out and averaged the price per yard and it came out to be $3.14 a yard!!! Tell me where can you get so many colors of Dupioni silk for $3.14 a yard! They said they will be having another warehouse sale in April!
Friday, October 20, 2006
First CQ Block
 Here is a better photo of what the block for the Encrusted CQ class looks like. I just took this photo, the velvets look better than in the scan I had taken. I also just finished some foundations for more blocks. I made two more 8 inchers, six 6 inchers, and three 7 inchers! That way they are just waiting to be made into blocks.
I have a question, are you supposed to add a seam allowance to the square? Like for a 6 inch block would you make a 61/4 in square and piece it to that size and then sew around the edge to 6 inch? Or do you just make 6 inch, 6 inches and add extra fabric around? OR do they really shrink and a 6 inch block is really a 5 something inch finished block.
Thursday, October 19, 2006
My First CQ Block
 After a lot of hard work, I finished piecing my first CQ block for the Encrusted CQ class I'm taking online with Sharron B. It is an 8 inch block. 11 pieces total. I have never before pieced one and I had a tough time because I didn't know what I was doing! It turned out great though and I love it! I just hope piecing gets easier when you know what you are doing. First I agonized over what colors to use, then picking fabrics then what order to put them in, and how to put them down with thinking of the over all composition. Then I had to pick more fabrics because I wasted because I didn't know how to piece efficiently. Oh and I snipped the muslin in the back while I was trimming seams too! LOL Okay now I'm laughing, it is funny! Oh and I had a sewing machine jam too! LOL And this scan doesn't do it justice! LOL The velvets look freaky in this scan but they are really pretty, they are green and a nice golden brown. Also you see that lace at the top? I added that after I was done! It looks like it sewed in though huh!? I love that lace! I got it from Pat Winter's Etsy shop.
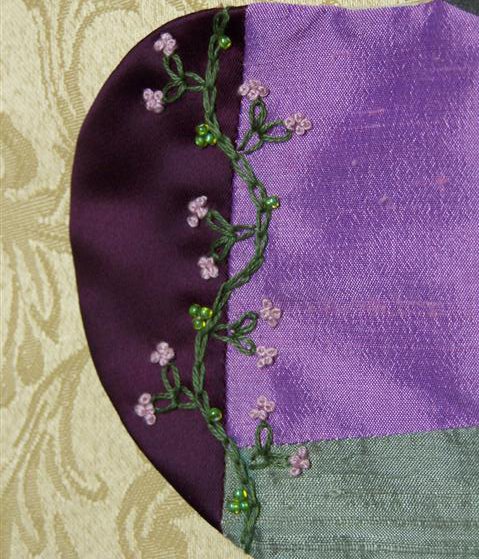
CQ Heart for my Sister: progress
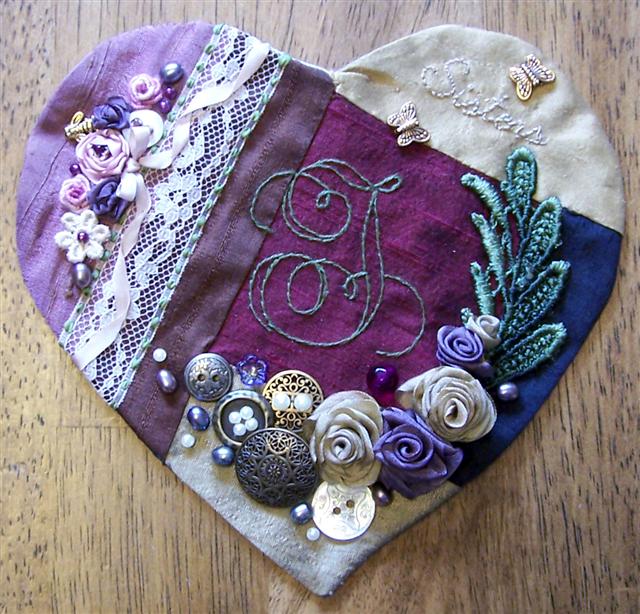
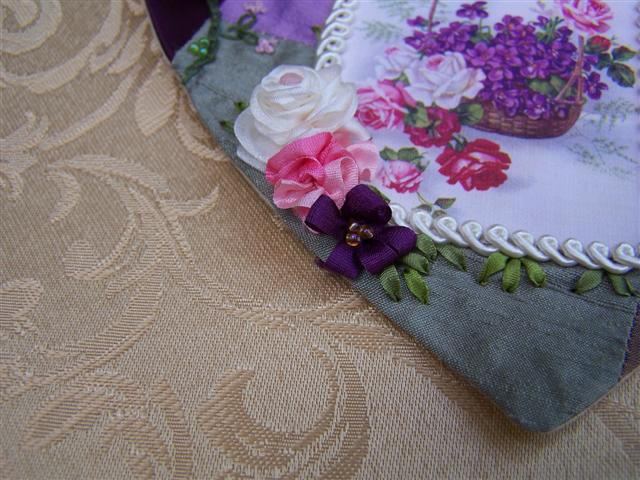
 I added some pretty green seed beads to the leaf, if you click on the photo you can see closer. I also attached the butterflies and sewed the folded roses together and added a amethyst seed bead to the middle of each. I still need to dye the 2nd leaf and add the seed beads to it. Then I'll attach the roses. The flower beads and leaf beads and pearls around are a trial. I think I like them there. The flower beads and pearls bring that color from the upper left corner down. Also I did those in 3's around the 2 roses to bring balance. I think it helps.
Off to dye the leaf!
Me and my Sister

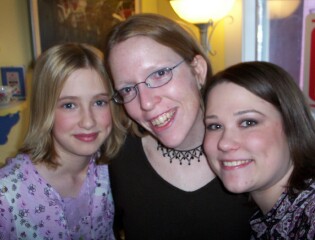 Here is a picture of me and my sister! Also my dear friend Christina. We were going around to the different antiquey shops and I was finding china and she was interested in these vintage hats, she would buy a few and then we all went to a tea shop wearing Joyce's vintage hats. It was a lot of fun. I don't get to see her very often so when I do we make the most of it. This was 2 years ago. The bottom photo is the day before when we all went to a tea shop and I ordered 'The Queen's Tea' so we could all feast! We had a lot of fun.
CQ Heart for my Sister: testing layout
 Here's my latest trial, what do y'all think? I think I like the second leaf, with the 2 roses and the bead. Don't worry I plan to dye the 2nd leaf too! Oh and I'm thinking of adding green seed beads to the empty slots on the leaf lace. I'm trying to do 2's because this is my sister, and I want it to have special meaning. The only thing is working with 2's makes it more difficult to find balance and flow.
Thank you to everyone who is giving me their valuable opinions! I really appreciate the honest feedback.
And please, if you have some feedback, I'd love to know. It won't hurt my feelings in the least. I promise to consider it. Anything helps my creative process, and helps me decide what I'm going to do.
Wednesday, October 18, 2006
CQ Heart for my Sister: Monogram
 I just finished the satin stitching on the 'J' and I love it!!! Now to mess around with the embellishments again! I made a scan tonight and I think it looks very real and close to what it looks like in person! Wow, I'm going to try scanning things more often.
I printed out a few copies of the heart so I can try drawing a few idea's out. I just read that idea in Sharon B's first lesson from the Encrusted CQ class that started today.
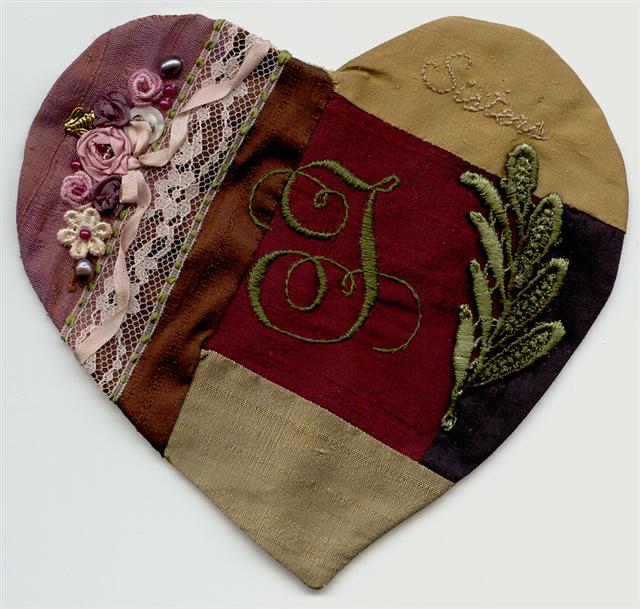
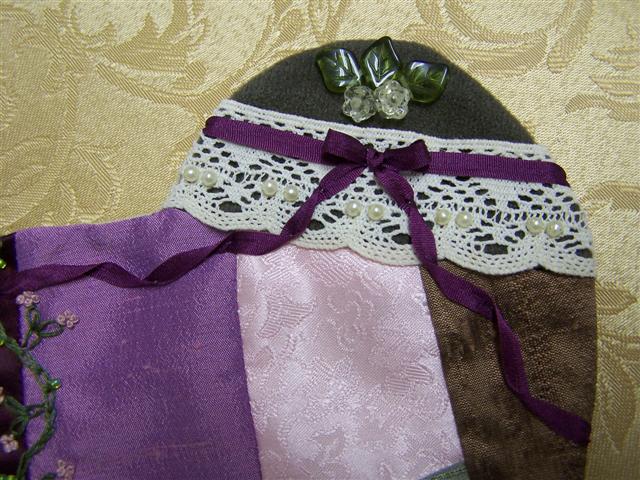
CQ Heart for my Sister: trial and error
 The other night I had a horrible time with this heart for my sister, Joyce. I wanted to do some pretty folded roses and a button trail but nothing was working right and it would always be way too overboard, in frustration I again laid out what I thought would look good and was telling my hubby that the middle is empty if I do that and I need something there like an image or a monogram and then it hit me! Just do a monogram! So I looked through my favorite book for inspiration. I'm going to fill in the thick area's with the stain stitch too. I found this 'J' and traced it with tracing paper and pinned the paper down and worked the stem stitch with 1 strand DMC floss. Then I laid out the embellishments again to see how I may do it and took this photo. This isn't the final of what I'm going to do but at least I now have an idea that I'm happy with. Do you all think your eye flows over the heart well? Do you have any suggestions for improvement? I've been debating with myself about maybe adding a trail for the flight path of the butterflies up top. I'm not sure if it would help or just detract from the 'sisters'. I really love this heart and I don't want to mess it up! I want my sister to have an heirloom!
Monday, October 16, 2006
My Favorite Spot
 This is my favorite spot to snuggle up in my house. I like to have my quiet time there, read my Bible and spend time with God. I also like to curl up with a novel and read there too. Madie will jump up and curl up by my legs or in my lap, and China lays on the floor right next to me. When I am elsewhere in the house Madie will take over my spot! It's her favorite spot too! Click Here to see Madie and China in their favorite spot!
What's your favorite spot?
Random Acts of Kindness Received
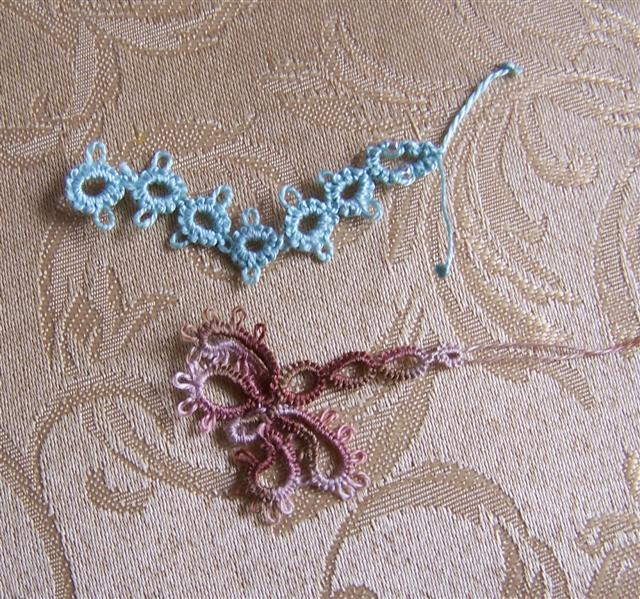 Aren't these tatted bugs gorgeous!?! I received a little card in the mail from Charlene and inside were these wonderful tatted bugs! I just LOVE them! They feel so soft, and delicate, and the color is wonderful! The little caterpillar even has bead eyes! You can click on the photo to see closer. I love dragonflies, and this one is just so sweet! I know Charlene doesn't like a lot of attention drawn to her but I just HAD to share the gorgeous work she did! Charlene are they made of silk???
Charlene says they are made of Finca cotton! They are so very soft! I love them. Thank you Charlene!
Saturday, October 14, 2006
Reclaimed Fabric
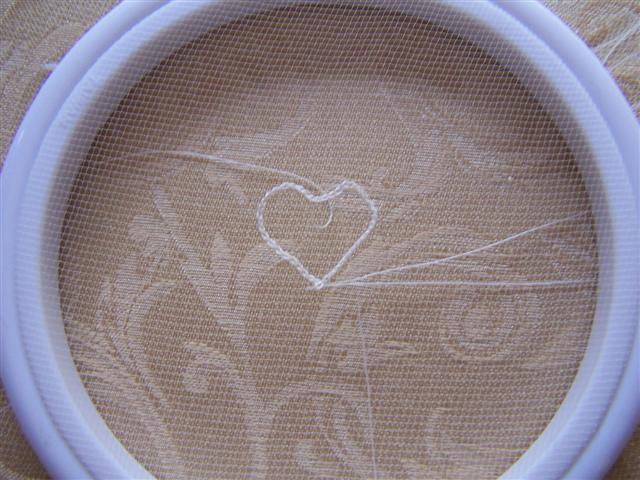

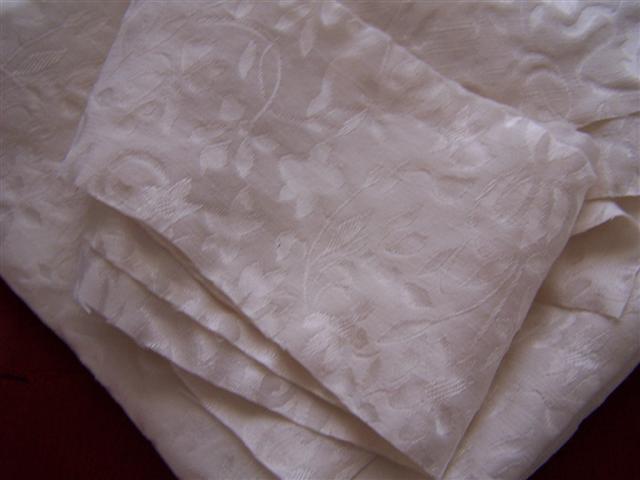
 Click on the photos to see closer. Well last night I tried out making some Tambour Lace and this heart is what I did. It's basically like thread crochet but with tulle in between. It's hard for me since it is so tiny and it slips easy! Also I couldn't draw out a design to follow on the tulle! I didn't have the hoop on a stand either but in my hand. I think I may like just embroidering on some tulle better than fiddling with a hook. I feel more in control with a needle. And that way I could sandwich the tulle with some solvey that has a design on it.
Here is some of the fabric I reclaimed! I love the unusual texture of the last photo! Although I think the remnant bins at JoAnn's and WalMart are better deals! Can you believe the price of thrift stores? Because of the high prices I just bought the ones I couldn't live without! LOL In fact after I left there I went straight to JoAnn's and got like 5 gorgeous remnants as well (which includes some silks and a plain green brocade too).
Thursday, October 12, 2006
Lillian's Heart: Finished!
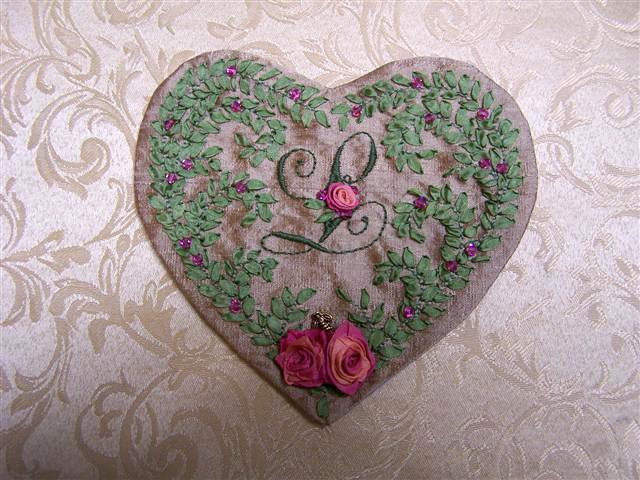 I finished Lillian's Heart and sent it to her last week but I wanted to wait until she got it to post the final photo so that she would be a little surprised! I love this heart! I love the colors, the vines, the scrolling 'L', the roses, the Swarovski crystals, and everything!
Click Here to see previous progress on the heart.
Random Acts of Kindness Received

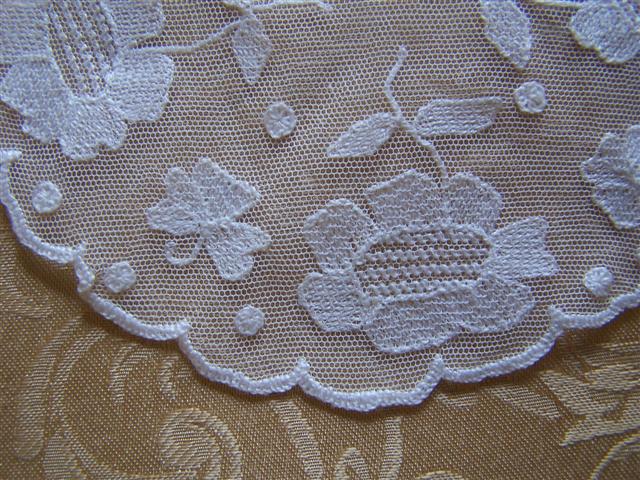 I'm so excited! Today I received a package in the mail and inside I found these 2 tiny crochet hooks to try making Tambour lace with, and 2 tambour lace doilies! And it's from Elizabet! Thank you Elizabet!!! I can't wait to try out making some tambour lace! And the doilies are so delicate, I could use them as display or in some CQ! I don't know which because they are so pretty, they would look good with my antique china, but then they would look good in CQ too! Oh the dilemma of pretty doilies! I'm curious as to what you all would do?
Display or CQ?
That is the question!
That is the question!
Click on the photos to see closer.
Sampler Stitches
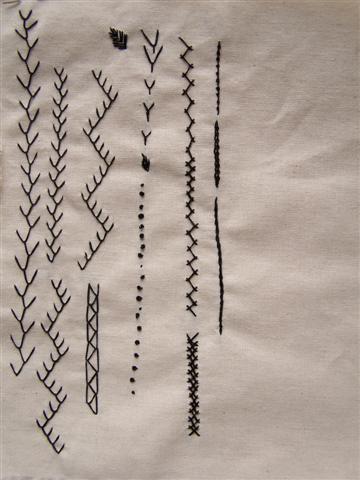
 Click on the photos to see them closer.
New stitches I tried are:
- The Herringbone Stitch
- The Double Herringbone Stitch
- Palestrina Stitch
- Pekinese Stitch
- Rope Stitch
Wednesday, October 11, 2006
Viola, sampler, and flower
 I thought I would take a better close up of the viola on my CQ heart since the previous post's was so dark.
It's made out of 4mm silk ribbon in loop stitches, 2 for the top, and 3 for the bottom (stitching the middle loop last), and then adding 3 amber seed beads to the middle.
 Then I was inspired to try some stitches I hadn't tried yet. So I got out a piece of muslin, and black floss and with 2 strands I stitched the feather stitch a few different ways. I also tried out the fly stitch and then messed around with the french knot and colonial knot. I've been doing the colonial knot backwards!!! But I now know how to do it the forwards way. I have to say that The Embroiderer's Handbook is awesome for learning! I haven't seen a colonial knot explanation in a book that I could understand before, but I could get this one! It has lots of photos of the steps.
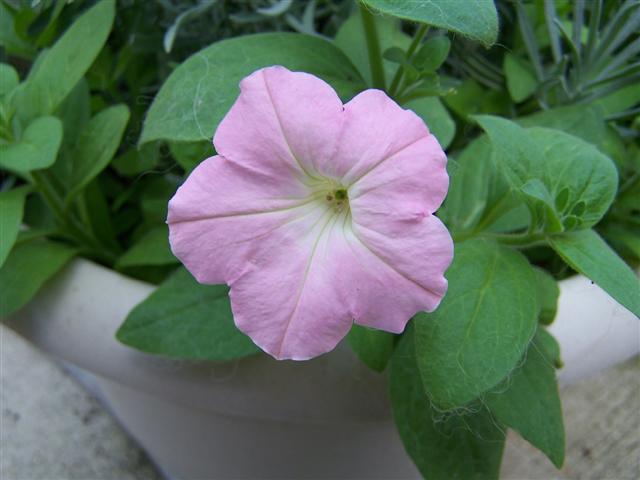 Last is a cute pink petunia from out in our back garden. We didn't plant it but the seeds fell into this pot and started growing. The original is long dead and was in a hanging basket. I just love it when plants reseed themselves! They are little gifts! Bonus plants! Thank you Lord God! I really appreciate the extra flowers!
Monday, October 09, 2006
CQ Heart: Center


 Today I printed out a image from my Victoria Rose Cottage CD on some 'June Tailor Quick Fuse iron-on inkjet fabric sheets' and cut it out, ironed it on and then embellished! I made a 13mm ivory folded rose with a pink glass bead in the middle to resemble the rose in the image. Also I made a gathered rosette out of some 7mm variegated silk ribbon. Then I made a viola out of 4mm hand-dyed silk ribbon I made last night, I had made another purple in my trial and error of the color match batch for the bow. Waste not, want not! I made 2 loops up top and 3 loops for the bottom, then I stitched 3 amber seed beads in the middle. Then I took 2 shades of 2mm green silk ribbon and ribbon stitched in leaves where I liked, and going up the sides of the image as well.
I also added some gold metallic thread to the hummingbird's beak so you can see it better. He's so cute!
I think this heart is finished. The only thing that's keeping me from saying 'done' is the upper right corner. I don't really like the solid ribbon going across where the bow is and then I feel the flower beads need a little more too. But I'm not sure what I'm going to do. I think I will wait and see what I get in the mail from Carolyn Cibik since I ordered beads from her close out sale.
Click Here to see the naked heart.
Sunday, October 08, 2006
CQ Heart: second corner
 Here is the work I did on the heart today. I've taken a break from my sister's CQ heart and have been working on this one. I put a lace trim and little pearls and then glass bead flowers and leaves. The 4mm ribbon bow I hand dyed to match the maroon piece of fabric. It was my first time dying silk ribbon! It took me awhile to get the color, because I'm not familiar with how the dye colors turn out yet. I'm thinking of adding a strand of metallic gold floss to the hummingbirds beak though because the black just fades into the shadows and he looks like a beak-less hummingbird! I think a stitch of metallic gold would be like a highlight and help him out. I'm still not sure what I'm going to do in the middle though!!! If you've got any idea's let me know. I was thinking of a garden scene or a bouquet of flowers. Hummm...what if I printed out a floral image on fabric and appliqued it where the 3 pieces meet and then embellish around that? I like that idea! I'll look though my CD from Victoria Rose Cottage tomorrow. I just got some printer fabric sheets and transfer sheets from WalMart to try out too.
Click Here to see my progress.
Saturday, October 07, 2006
Silk Ribbon Embroidered Hummingbird
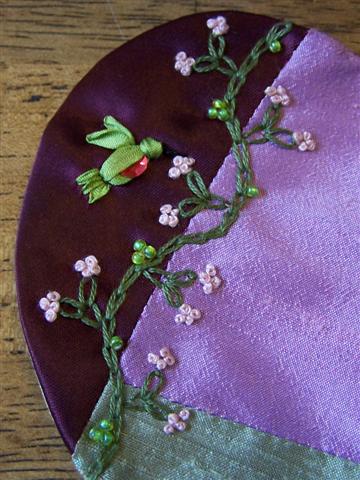 Here's my experimental hummingbird. I wanted to have a reflective throat so I used a red sequin. First I made a straight stitch in green 4mm then I stitched the sequin on cupped side up, then I stitched another straight stitch overlapping the previous one and covering half the sequin. Then I made a french knot for the head and covered it with a straight stitch. For the wings I used the 4mm and did 2 ribbon stitches pierced near the edge instead of the middle. The tail I used 2mm in a matching green and made 3 ribbon stitches. You could do the tail in 4mm as well but I thought it looked nice in 2mm. Last I stitched the beak in a straight stitch with 2 strands black floss, although you can barely see it in this photo!
Click Here to see my progress on the heart.
Friday, October 06, 2006
First CQ seam treatment
 Today I stitched this seam treatment from JBM's book Floral Stitches. I also added some green seed beads to it as well. It's the chain stitch with french knots. The color is hard to see but it picks up the pink from the lightest piece and brings it over. I'm wanting to stitch a tiny hummingbird but I have no idea how I'd go about doing that! I'm thinking of using 1 red sequin for it's throat, that's how small I want it. But I think I'd need to doodle how I'd want to do it and play on a scrap before attempting to stitch it on the heart. If anyone has any ideas let me know.
Click Here to see my progress.
Thursday, October 05, 2006
Easy Low Calorie Tiramisu

This recipe is originally from Kraft, but I adapted it to be reduced calorie by changing a few of the ingredients. So if you want the original recipe Click Here
I'm going to tell how to make 1 and you can multiply to make however many you need. It's a very adaptable recipe.
You'll need per serving:
- 6 reduced fat vanilla wafers - Coarsely crush the vanilla wafers and place in serving cup
- 2 to 3 Tbs coffee - drizzle over crushed wafers so that they are saturated (I prefer making a real cup of coffee for this recipe but you can use instant coffee too. 1 cup of coffee will make about 4 servings)
- 1 sugar-free Jello vanilla pudding cup - top with contents of pudding cup
- 1 or 2 Tbs sugar-free Cool Whip - top with Cool Whip
- Cocoa powder - place a little cocoa powder in a mesh strainer and lightly tap to sprinkle the cocoa powder over the tiramisu
Finished!
Now repeat until you have as many servings as you would like.
Now repeat until you have as many servings as you would like.
My Favorite Embroidery Books
 Here is a list of my favorite embroidery books.
Inspirational Designs
- Treasury of Floral Designs and Initials for Artists and Craftspeople-Great book for inspiration for Monograms and antique looking designs
- Victorian Alphabets, Monograms and Names for Needleworkers from Godey's Lady's Book and Peterson's Magazine-Great selection of Victorian Alphabets
- Embroidered Monograms & More-Has iron-on patterns
- Embroidered Monograms & More, Book 2-Has iron-on patterns
- White Work: Techniques and 188 Designs-Has wonderful patterns not just for whitework. Does not have photos of whitework but I love all the patterns.
Instructional
Here is a link to Nordic Needle that has the hard to find A-Z books at a reasonable price.
Here is a link to Nordic Needle that has the hard to find A-Z books at a reasonable price.
- *The Embroiderer's Handbook: The Essential Step-by-Step Guide to Creative Stitches and Versatile Techniques * Perfect book for learning stitches, great basic companion to have, has some silk ribbon embroidery as well as other types of embroidery. Highly Recommended for learning
- Floral Stitches: An Illustrated Guide-Has ideas for flowers, basic flower instructions, and stitch combo ideas for crazy quilting
- An Encyclopedia of Ribbon Embroidery Flowers: 121 Designs-Has lots of ideas/instructions to create flowers with silk ribbon embroidery
- A-Z of Embroidered Flowers-Mostly project style for types of flowers, also has some instructions
- A-Z of Ribbon Embroidery-Wonderful basic book to learn and create Silk Ribbon Embroidery. Highly Recommended for learning
- *A-Z of Embroidery Stitches * Perfect book for learning stitches, great basic companion to have, has some silk ribbon embroidery as well as other types of embroidery. Highly Recommended for learning
- Embroidery for All Seasons-Awesome book for embroidering and creating flowers and gardens using thread. Has a flower glossary on how to create tons of flowers, and has projects, and project ideas. Highly Recommended if you love embroidering flowers and gardens.
- Silk Ribbon Embroidery A Workshop Approach for Beginners-Great book for Tips and Technique. Good for learning SRE with a second book like A-Z of Ribbon Embroidery. Or if you already know the stitches but need technique help.
- Bead Embroidery - Great book for learning bead embroidery has lots of techniques and ideas. Recommended if you want to try bead embroidery
5 Weird things about ME!
 I've been tagged by Charlene. I was asked to list five weird things about myself on my blog, then ask you to do the same.
- I don't like ice in my soda and I pull the pickles out from my cheeseburgers!
- I wait to drink anything until after I eat
- My Dad likes to wear M. C. Hammer pants and anything bright and neon...he also loves to wear tye dye shirts! (yes at the same time) Here's his blog: Crazy Dogs Den
- I like milk in my tea...that's not too weird but most people don't do it. I also don't like sugar in my coffee, unless it's flavored.
- My hair wasn't curly until I got into my teens, then it went wacky! But now I love it I can go curly or straight depending on the weather and my mood.
Wednesday, October 04, 2006
CQ Piecing Links
 Here are some links on Crazy Quilting that have helped teach me! Have fun!
Here is my tutorial of creating a block.
Sharon B's Crazy Quilt Info - has tons of info from sourcing fabrics to embellishing to finishing!
Foundation Piecing
Another Foundation Piecing
Fan block
Lillian's CQ Crash Course
Crazy Quilting International
CQ Heart
 Well this morning I was feeling inspired and I had the sewing machine out to sew up Lillian's heart, so I sewed up another CQ heart! The pink and purple fabrics are from Lillian too! I'm a beginner at CQ so I didn't even think of adding edgings in with the seams, but I think I would have passed for now anyway because I'm not a very experienced seamstress and I'm very new to piecing together...I consider the fact that I didn't get any puckering this time a great advancement!!! I even ironed open the seams in the back and pressed it when I finished!
I know that there are know rules in CQ, hence the Crazy with the Quilting, but I went ahead and finished the edges before embellishing when normally you wait to finish it until after you embellish. I just think in my brain it's easier than having to finish around embellishments. The only problem with this is if I want to add lace edging across a seam I'd have to wrap it around and then it looks chunky!
I have no idea of how I'm going to embellish! I don't have a plan for this heart, other than I think I'm going to use it for a swap. Wow! A blank slate! I could do ANYTHING! LOL Somehow that always makes it harder to make decisions! LOL
Click Here to see my progress!
Tuesday, October 03, 2006
Stem Stitch Triumph!
 I have finally 'got it'! I asked for help and help I got! The tips that helped me the most were:
- Stay on the line! Don't do the whole slant from one side of the line to the other.
- Don't worry about making the rope effect, just stay on the line and do the stitch and it will take care of itself.
- Make the stitches smaller around the curves.
- Stitch like you are going to go back into the previous stitch's hole, which would be in the middle of the current stitch. But stay on the line!
Brooch for a Friend
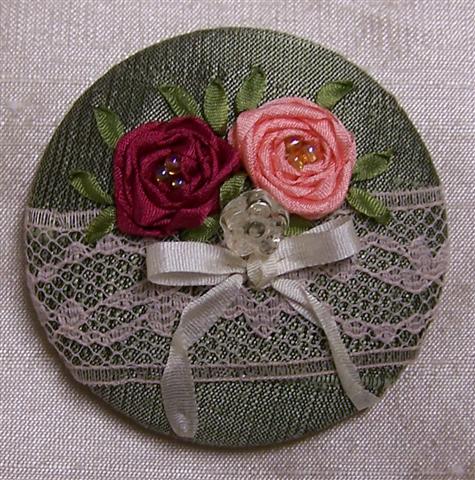
 I made this 2 inch button cover brooch for a friend using 3 shades of purple 4mm silk ribbon for the bow and spiderweb roses, and 2mm green silk ribbon for the leaves, and 2 purple Swarovski crystals in the middle of the roses, and a little purple flower bead over hem tape lace and green Dupioni silk.
Monday, October 02, 2006
Button Cover 3
 I really love this button cover I made. It's more like how I did my sister's heart with lace and a bow and roses with beads. I even used 2mm green silk ribbon for the leaves. This is my last one to make for the contest I'm entering.
To see second button cover Click Here
To see the first button cover Click Here
Brooch for a friend Click Here
Joyce's Heart: Sisters Redo
 Well I ripped off the stem stitch "sisters" and replaced it with back stitching. I still don't really like the way it looks but at least it's more readable and I want the word there so I'm going to leave it this time. I think it's the floss I used that's causing trouble, that and using tracing paper. Oh well I'll know for next time. Now on to more embellishing! FUN!
Joyce's Heart: Sisters

 This morning I decided to stitch in the word "Sisters" on my sister's heart. And I choose to try the stem stitch again...dun dun duunn...bad move. I got out my favorite book on embroidery and went over how to do it again. I feel that I understand it better now but I just don't like how it turned out! The big S is the best part, and maybe that's what my problem is I'm trying to do the stem stitch too small? You ladies who are good at the stem stitch please look at it and see if you can tell if I'm doing something wrong or why it's not turning out as nice as I'd like. I used 1 strand of the premium 6 stranded silk floss from Hand Dyed Fibers. One strand looks to me like Perle floss. The color isn't coming across in the photo that well but it is pretty. It's called French Artichoke and it's a variegated muted-pink-goldish-cream-green.
Okay y'all...should I just leave it alone? Or should I rip it out? I'm thinking I should leave it alone and that if I rip it out it may make things worse than just leaving it. But if it's not readable then, I don't know that I should keep it either. It just looks messy to me.
Now for the Good News! The leaf motif I dyed with the silk ribbon dyes...I don't think it's permanent though for the motifs, because the motif isn't silk, Ribbonsmyth has dyes for rayon motifs too but I haven't bought them yet. I'm hoping if I win the button cover contest to use the $25 for the motif dyes and some motifs from Ribbonsmyth.
Oh and I'm wanting to stitch something else around the word Sisters too...I'm thinking 2 butterfly's like this. If anyone has any idea's for me, please feel free to comment or e-mail me. Now I need to finish up one more button cover for the contest. The deadline is the 7th!
Remember if you do not have Beta Blogger just click on "Other" or "" to comment.
Subscribe to:
Posts (Atom)